The Accounting is science and art …..
The characteristic of our program is the lack of need to be widely aware of accounting or be technically good .. But it is sufficient to distinguish the debtor party from the creditor or the party giving the recipient, where each account nature Either to be debtors and when the balance increases or amount must be at the right (debtor) of the restriction and vice versa.
This distinction is not difficult. For example, the account of the Fund is of a city nature. Therefore, when an amount is entered into the Fund, the Fund is established in the debtor’s party of the contract and thus it is the first party (the first condition) However, if the fund is an impulse, any amount that comes out of it is first of a kind of city, and secondly it is the mu’ti, not the beneficiary, and therefore it must be placed on the left side of the loan. We can drop this situation on any account.
Two (theoretical) sections: accounting department, consisting of (constraints, balances and accounts) and a related section And is called and (materials, warehouses), and invoices between accounting and warehouses and the important thing is the link between the accounting and warehouse in it.
Where we prove when the movement has a substance or group of substances we are enough to prove that the nature of the bill by the movement
And automatically after storage we see the accounting restrictions that will control this movement computationally and accounting
.
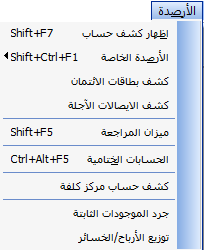
Learning Lessons
Explanation of program lists
Every transaction in actual whether small or big must have an accounting record, in other words, every transaction must be proven to reach an accurate and orderly work. This proof is called a daily entry, as every transaction must have a daily entry to prove it.For example, if we paid SYP 500, this transaction must be proven by the following entry: 500Debit: Shipping expenses500Credit: CashPayment of shipping expensesAnd that’s when the payment is in cash. The special thing in accounting programs in general and in our program, in particular, is that the accounting entry is recorded for each transaction automatically without the need to type a full accounting entry, except rare and few cases depending on the situation.So, each invoice automatically generate its special entry and post it to its special ledger accounts.

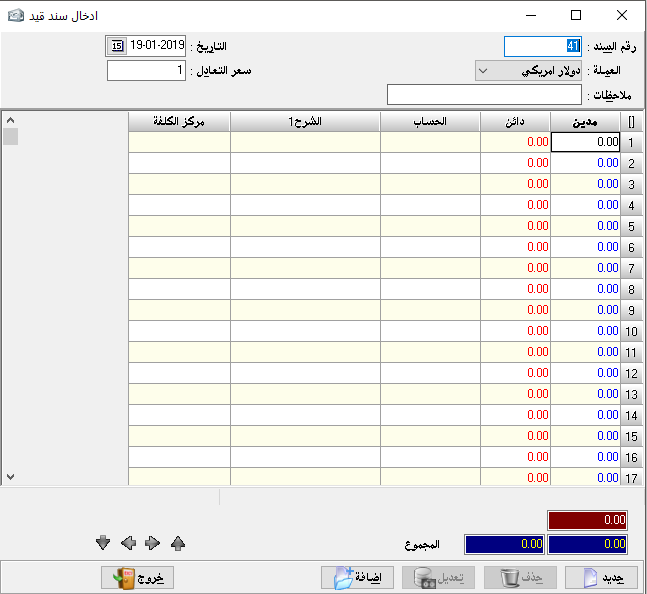
Create a simple entry:
A simple entry is an accounting entry in which just one account is debited and one is credited with a description, so it has no more than two parties.
– Entry number:
it is arranged automatically according to the sequence of operations in various forms.
– Date: it is the date of writing or proving the entry.- Currency: the currency in which we want to prove the entry and its rate must be pre
-determined for the Syrian pound through the rate equivalent
.- Equivalent rate: it’s the rate of chosen currency against Syrian pound.- Debit account: it’s the first party of the entry (Debit).
– Credit account: it’s the second party of the entry (Credit)The debit and credit accounts can be determined by the original nature of the account and then by the case where the account is taken or given.
– Amount: the value of the entry or the amount of the accounting transaction.- Document: it’s the original paper document number, for the purpose of linking the original document to the accounting program.
– Description: is the explanation that should be mentioned in the entry to clarify it.The red arrows at the bottom of the entry were explained earlier in the invoice show section.
insert accounting entry:
It is the entry that the debtor or creditor can have a set of accounts (more than one account for each party). For example, if we want to prove payment and expense on a particular invoice we cannot prove it by a simple entry but there must be a complex journal entry because there is more than one party and of course this entry is automatically created.
– Currency: it is must be chosen to create an entry by that currency.
– Equivalent rate: it’s the rate of chosen currency against Syrian pound.- Notes: We may mention the document number related to the complex journal entry.
– Date: the date of the entry.
– Debit: where we type the amount related to debit party and in front of each debit account.
– Credit: where we type the amount related to credit party and in front of each credit account.
The account: where we type the account name whether it is debtor or creditor, while which determine its nature is the opposite amount if it was typed in the debit cell so the account must be debit, and if it was typed in the credit cell the account must be credit
– Document: it’s the original paper document number, for the purpose of linking the original document to the accounting program.
– Description 1: it is to explain the purpose of the entry and the transaction.
– Description 2: Additional explanation about the transaction.
– Currency: We can choose a currency for each line and we can create an entry with more than 99 currencies, and this option appears with additional options by double-clicking on the small rectangle above number (1) and beside the word Debit
.- Equivalent rate: it’s the rate of chosen currency against Syrian pound.
– The second party: Its use is rather special, it is used to prove the account of the special transaction that made on a particular material and that if we have singled out a special account for each material to control its movement independently, for example, shirts sales account and trousers sales account.
Also, used when creating a complex entry where it usually appears in the second end of the entry when you request to show the account statement of word others. The second party here is used to put the opposite account to mention this account instead of the word “Others”.
– Local: Used if we wish not to show a specific entry when we request an account statement for any account but not the original currency where the amounts of all entries are transferred to the foreign currency except the local entry, which is greatly beneficial in entries of the foreign currency exchange differences.

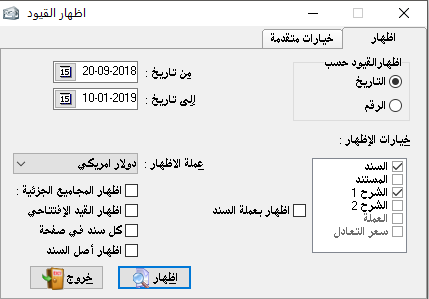
Show entries:
This section is used primarily for displaying all or some entries that are recorded manually or automatically. These entries can be shown by date or number.
And we can use it to print entries periodically if we want to keep an archive about them or when the system of the organization requires the printing of the journal entries or entries in general.- Show entries by:
1- Date: where it arranged according to its chronology.
2- Number: where it arranged according to its numerical sequence.- show options: as follows:
– Entry: and it’s the number of entry which was created in the program.
– Document: it’s the original paper document number, for the purpose of linking the original document to the accounting program.
– Description 1: it is to explain the purpose of the entry and the transaction.
– Description 2: Additional explanation about the transaction.
– Currency: where the currency in which the entry is created appears along with this entry.
– Equivalent rate: it shows the currency in which the entry was created against the primary currency.
It can be activated by choosing showing currency option (entry currency).
– Showing currency:
Where we can show all documents in a particular selected currency or show them each according to the currency in which the transactions were created.
– Show subtotals: it means to show the sum of each complex entry under the sections of this entry, but if the entry is simple it does not belong to it.
– Show opening entry: it is the entry that was written at the beginning of using the program in order to configure the opening balance sheet.
It is automatically created by inserting the rounded balances into accounts cards and materials cards, or the opening entry can be created first, therefore these items are automatically transferred to the rounded balance on each card.
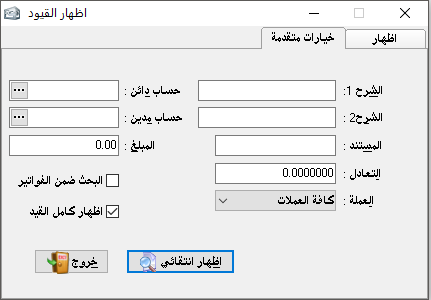
Advanced options:
It will make it easier for us to find a particular entry that we want to show or make sure if it was created.
– Description 1:
It is enough to type a part of any word that was mentioned in the first entry description, to show all entries that share this word in the description 1 section.
– Description 2:
it is the same as description 1.
– Document: It is enough to type the original document number that mentioned in the entry to show it solely.
– Equivalent: it is enough to type the particular equivalent rate related to currency to show us all entries that prove the currency equals the related rate against Syrian pound.
– Credit account:
where we type the credit party of the entry and the program will search for all entries where that account appears as a credit party.
– Debit account: the same definition as the credit account but with different terms.
– Amount: we can search for a particular entry by its amount by typing the amount here.
– Search within invoices: here the program search for particular detail within invoices only or more accurately within invoices entries only.Note: Among the mentioned, to search for a specific entry we can collect all searching options together. For example, we can type (Payment) in description 1, Document (300), amount (40000), credit account (Sameer)… and all those filters will find a specific entry so we can reach the wanted entry by many options.
– Currency:
we can search for entries using one specific currency.
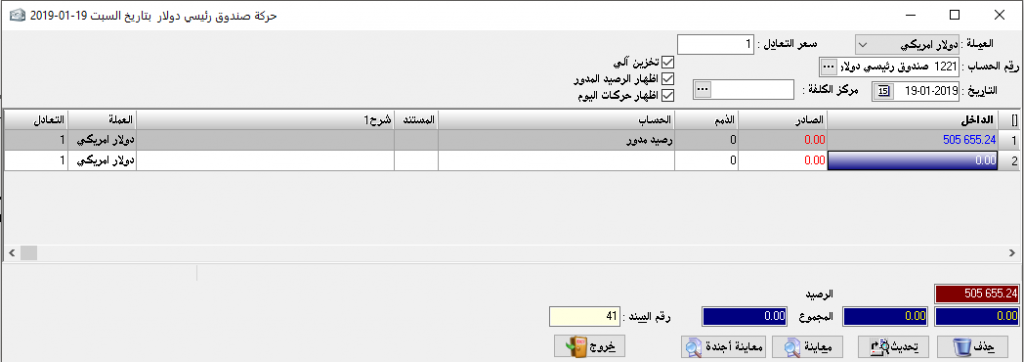
Cash movement:It is considered one of the most important and most used sections in the program and it is very vital, saves us a great effort and time, and reduces the possibility of error in writing the cash entries especially to zero (i.e., which related to cash account)It is sufficient to mention the cash transaction that has taken place as if it is outward or inward the cash and the program will create the necessary accounting entry and this section can be used with any accountand it is enough to change the account number to the wanted account.- Date: it is the date of transactions.
– Automatic save: it means storing the transaction without confirming it.
– Show the rounded balance: it means to show the account balance from the previous day (we will use this section as an example in cash account because it is the most important application).
– Show transactions of a specific day: it is to show all journal entries that were created on a specific day, and this for transactions not related to cash
.We can get additional options by double-clicking on the rectangle that is located above the number (1) and beside the inward field.
– Inward: it shows the rounded balance and all amounts entered the cash.
– Outward: it shows the rounded balance if it is credit and all outward amounts at the same date chosen up.
– Receivables: it appears when we choose to show today transactions, and it includes amounts of recorded entries which not related to the cash account.
– The account: it is where mentioned the receiver account (when the case is payment), for example (100) SYP in outward and in account name we type the account of petty cash expenses that is we paid 100 SYP for petty cash and we can explain it in the description section.
– Document: it is the original paper document related to this transaction, and here the most used is the receipt number.
So, when we prove payments from customers and to suppliers it is easier for us to create it using cash movement because we have to write only one part of the entry, so we can prove the receipt number directly in the document field, and the program will complete the entry and store it by case.
– Description 1: to explain the written transaction.
– Description 2: for an additional explanation about the transaction.
– Currency: we can use any currency while creating cash movement as creating accounting entries.
– Equivalent rate: it is the equivalent rate against the Syrian pound for each transaction.
– Red rectangle at the bottom if on the right indicates the debit balance of the cash account (the amount remains in cash after posting all transactions), and if on the left indicates the credit balance of the cash account (i.e. we paid more than the amount available in the cash and this requires checking for it).While the first and the second blue rectangle shows the total debit and credit of transactions. The third rectangle shows the sum of receivables transactions and appears only when you choose to show today’s transactions.
– Entry number: (and it appears at the bottom of the table) means the accounting entry number that was written, and the numbering is automatically generated to prove the transaction.So briefly this section can be used as a journal entry or cash book exactly.
In the inward field, we write the amount received and in the description, we write the name of the account which paid to us, in the outward field we write the amount paid and the description is the name of the beneficiary account. For more explanation try to write a payment from customer number 1 for example then choose to show entries, and you will find the following entry: Debit: CashCredit: Customer number 1DescriptionTo delete a particular transaction in the cash movement you must know the entry number from the bottom of the page then go to the section of creating an entry and choose the entry number to delete it then choose delete.Note: in cash movement, you can move between the previous day and the later day by using Ctrl+Pageup to go to the previous day and Ctrl+Pagedown to go to the later day.
accounting entry:
It is almost like the cash movement, but it can beused for any account more easily.
– Account number: we choose here the name or number of the account we want to post all entries on it. So it is the other party of the entry whether it is debit or credit.
This is shown in the inward and outward fields and there is a very important difference, which is the date where we can write the transaction at any date we want while the cash movement is restricted by a specific date or we have to move between days within the cash movement.
– Inward: we write her the amount representing the credit party of the entry where the account we have chosen at the top is the debit party of the entry. i.e. the opposite of the cash movement.
– Outward: we write here the amount representing the debit party of the entry where the account we choose is the credit party of the entry.
– The account: it is the other party of the entry and can be known by location of the amount in the field inward or outward.
– Document: it’s the original paper document number, for the purpose of linking the original document to the accounting program.
– Description 1: it is to explain the purpose of the entry and the transaction.
– Description 2: Additional explanation about the transaction.
– Currency: it can be activated when we have more than one currency within the program.- Equivalent rate: it is the rate of the chosen currency against the Syrian pound.
– Date: we can choose various dates for each line
– The red rectangle, the two blue rectangles, and the document number are the same as what explained in the cash movement about it.
– Delete: to directly delete a specific entry without back to the section of creating an entry to delete it.
exchange rate differences entries:
If the organization has transactions in foreign currencies, and as a result of changing in foreign currencies rates, there must be differences between the balance of the foreign currency and its value in the Syrian pound.
Therefore, a special account must be created in the chart of accounts to prove the differences in foreign exchange.
The task of this section is to make a continuous comparison between the balance of foreign currencies and the exchange rates entered and then to calculate their value in Syrian pounds and to prove the differences in the respective accounts.
Here we create a debit exchange differences account and credit one, or we can use one account for both cases.
In the exchange rate button, we enter the rate of each currency as a basic rate of comparison, and of course, the rate of the currency must be at the moment when we calculate those differences.End:Use it to exit from the program.
Create/correction of account:
The task of this section is to characterize or define the necessary accounts to build our chart of accounts, where the chart of accounts is based on the principle of grandfather, father, and son.
There must be a primary master account then a secondary master account which will be divided into sub-accounts.
And another master accounts can be divided from the secondary master account as needed.
It is preferable to start with the number (1) and to name it the general assets which is a master account.Account number:
write in the account number (1)Account name:
write it general assets.Account type:
choose it master.Origin:
it means with which this account is linked to or which is the original or top-level account of it. (in our example there is no origin because it is the original account)Posting: where it should be closed and in which closing account should be posted.
We can choose (Balance sheet).(Address, notes) there is no accounting impact related to this section, but for more explanation.
Group: it means this account for which qualitative account belongs and the qualitative account will be explained later.
Archive: it is a particular archive related to the client we can put here full details about the client in addition to his photograph or his identity photocopy.
Distributor: here we can put the name of the employee responsible for the client to link between their accounts together.
Commission: it is the amount of commission that calculated directly to be paid to the related distributor, and the distributor’s name appears automatically on the invoice as the linked customer’s name is chosen.
Rounded balance: it the current account balance (only if the account is sub-account this section will be activated) when we post our accounting books to the accounting program if the project is already in place.
It would create part of the opening balance of the project.
Debit balance: it shows the balance status when we return to the card later, and we cannot write in this field.Credit balance: it shows the balance status when we return to the card later, and we cannot write in this field.Current balance: it shows the balance status when we return to the card later, and we cannot write in this field.Title: it means the title placed in front of the account name for more tact showing like Mr. Mohammed Ahmed.Balance: it means the original nature of this account if it is debit, credit, or is fit for the both of them…
(all that are involved under assets and expense is deemed to be debit and all that are involved under liabilities and revenue always credit).
Level: to determine which users are allowed to deal with this account, whether it is primary or partially.
And in case of restricting a specific level, this account or its balance will not appear for this level, not by searching, reporting, or even by the chart of accounts.
You can also select either hide account only, hide transactions only, or show balance only.Discount ratio: the percentage taken by the customer specified on this card.
When you write any invoice, the program will read the price of the material from its card as predetermined and read the discount percentage and then the material will appear in the invoice by the price after discount automatically.
Special balances: used in order to link a group of accounts that related to each other (statistically) such as customers of a particular material or customers who make payments with a specific frequency (for example, on Thursday).
Or customers from a specific area or customers related to a specific employee who is responsible for them.
These balances are selected from program constants, then general constants, and then special balances field.
And after specifying it we go back to account card to put the special link related.
This will be explained in detail in later sections.Back to the example: number (1) is general assets.
– its type is master without origin.
– will be posted to balance sheet, and that’s all it takes.
About the first branch from it is number (11) for example fixed assets:
– its type is master also.
Its origin to number (1) and automatically appears the section of posting based on its origin account.And the first part of the first branch is the number (111) for example is buildings:
– Its type is sub-account.
– Its origin to the account number (11) and will be posted as its origin and we can insert a rounded balance on it and it’s always debit, and it’s not required to be classified under one of the special balances.
The second sub-account is (112) for example vehicles has the same specifics of the account (111).And about the second branch (12) for example current assets:
– Its type is master, and its origin to the account (1) and will be posted as its origin.
The first part of it is (121) for example customers:
– Its type is master.- Its origin to the account (12), and will branch from it the customer number (1)Then we will have the following card:When we want to add another customer, it’s enough to write in the number field the sub account number (1210) and then press on button F7 so automatically it will take the number (121002) and so on.
There is a third type of accounts, which is the qualitative account and it has great importance, through the qualitative account we can link a certain group of accounts whether these accounts of the same nature or different from each other but we have a purpose behind this linkage.
For example, we can link a particular revenue account to a specific expense account that might be the expense of this revenue.
So, when we request an account statement for this qualitative account, we will have the result of clearing between these two accounts, which are the qualitative account.
Or we may link two accounts related to one client may be a customer or a supplier and we want to know his net balance thus we can create a qualitative account, and it can be said that the first use of this qualitative account is the linking of accounts that share in certain properties and we want to see it together.
For example, maybe the investor has another activity and this activity is so small that it is not necessary to completely separate its accounts.
thus, he can create the accounts necessary for it in the existing chart of accounts and then defines a qualitative account in the name of this activity and linking all accounts of this activity and thus he will have a small balance sheet within his general balance sheet showing this activity separately from the rest of the accounts.
The real advantage of this feature is evident in the practical reality of each investor of the program and according to his system of work

We can now take a look at what we have done through show accounts section in the title of the accounts.
This section shows us the basis of our work, the chart of accounts.
When the chart of accounts is correct our beginning is correct. Hence, we can take several options by pressing the right mouse click when we stand on any account and this makes it easier for us to set up and continue the chart of account. (Note: in our example, we did not use the chart of accounts of the common accounting system for simplification first and because it is not fully used in all projects).In options item we can find:
– Show the closing account: it means to show where the account will be closed.
– Show sub-accounts: where sub-accounts appear under the primary account or secondary account.
– Show qualitative accounts: it means show qualitative accounts at the end of the chart of accounts.
And from the level section:We can find the level of the account we want to show, and if we choose all levels it means all accounts will appear.Under the section of show we can find:
– Show accounts: and this is where the chart of accounts is placed in a regular table, ready to print it this way.
– Preview: it’s used to review the chart of accounts before printing.
– Printing: to print the chart of accounts.
– Show the specific account: here we only show the chart of accounts of the main account we choose.
It is very important before we continue to prepare the program according to the nature of our activity that we take a thorough understanding of the way the chart of accounts is prepared and prepare it in a thoughtful manner.
The distributor of the program can be helpful simply and at every moment of preparation to take advantage of the accounting consultancy.
Opening entry:
Through this window, we can insert opening balances of all accounts (which defined in the chart of accounts) by placing the amounts in the debit or credit according to the balance, with the account name next to it.
opening entry is used at the beginning of using the accounting program to insert the opening balances and then start the accounting operations.

It is a statistical or reporting section in the program, as it shows the results of the previous entries mainly related to the accounts.
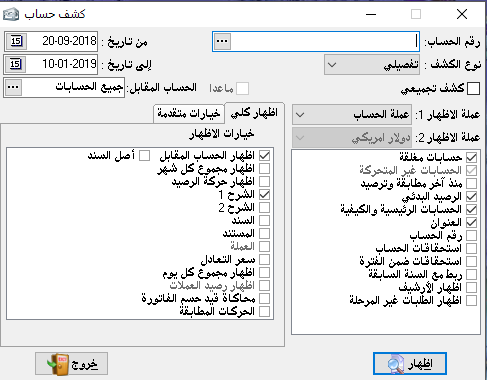
Show account statement:
It is a very important section in the program as it is widely used especially for matching and settlements with customers, every customer must ask us or send us a statement of account. All details of the customer’s account have been taken into account.
– Account number: we can choose one, all, or group of accounts that fall into one main account, one sub-account, or accounts that are selectively taken.
– Type of statement: here the show options at the left end are changeable by the type of statement you want as follows:
Detailed:
The most important thing that appears in it is the invoices but in an overall view, it does not appear within each invoice its details but the total value of the invoice, its number, and date. And we can note the following options:
– Show opposite account: it means the second part of the entry that written to prove a specific transaction with the selected account or accounts for which we have requested to show statements.
– Show the sum of each month: at the end of each month we show the sum of the debit transactions and the sum of credit transactions made on specific account during the required month.
This is useful for us to know the volume of our transactions per month with the selected account. And this may be useful in knowing the extent and viability of dealing with us in the coming period.
– Description 1 and 2: it is the comment added to the invoice in the notes section or to the accounting entry in the description section.
– Entry: it is the entry number that done in the program and on that account.
– Document: it’s the original paper document number, for the purpose of linking the original document to the accounting program.
– Currency: it can be activated when we have more than one currency within the program.
– Equivalent rate: it can be activated when we have more than one currency within the program.The options on the right side:
– Show closed accounts: it is accounts which its balances are zero when requesting its statement.
– Show non-moved accounts: any accounts which no invoice or entry has been written on it, therefore only the initial and the final balance will appear.
– Since the last match or settlement: here is the account that has been matched and proved in the field of matching balance from the miscellaneous section.
Or the account whose balance is zero where this account is automatically matched where this statement is shown from the date of this match.
– Show initial balance: show the rounded balance from the last year and when we don’t choose this option means that we want to disclose the transactions for this year only and without taking into account the initial balance of this account.
– Show primary and qualitative accounts: it means that when you select a statement for a primary or secondary account the primary account will appear with the total beside it and under it will appear the sub-accounts and partial accounts that are configured for the primary account. And if this option is selected, the accounts will be arranged on the basis of the account number and without another classification.
– Show address: it means the address of each account beside its name, and address is pre-written in the account card.
– Account number: account number in the chart of accounts beside his name. this option may not be used if we want to send a statement to a particular customer because it is not necessary to recognize the way our chart of accounts is.
– Maturity of account: it shows the maturity amounts that have been written on this account with disclosure as they are usually requested independently but here we can take them independently or merged with the statement of account.
– Maturity during the period: it shows all due amounts related to this period.
– link with the previous year: this feature allows us to extract any account statement that was for this financial year and for the previous year together and without having to close the files of this year and go to the files of the previous year to extract the statement.
Here you must locate the files on which the previous year data is located, and this is done from the section of the program constants then general constants.
– Show archive: it was written in the account card and represents the client’s self-image or his personal card image and its importance is considered an accurate reference to the address and phone numbers of the customer.
all of those previous options from the full show section under the detailed account statement and in the advanced options section we can have the highest possibility of searching:For example, if we want to search for an entry in which a particular word is mentioned (by Fouad) it is sufficient to write (by Fouad) in the explanatory section and then press show to show this entry in isolation from the rest of the entries.
And also in the same way we can search within the document or search for an invoice in which we mentioned a specific item, we write the name of this item within the field material.And if we want to know the entries in a particular currency and by which exchange rate, such as a dollar when the exchange rate was SYP 52.20.
so select the currency Dollar and the exchange rate is 52.2 then press show.
If we want to find a certain entry and we only know the amount, so we can limit all the entries or invoices which only contain this amount through the minimum and maximum amount option.
By all these options we can find the lost transaction or make sure about an entry that we were not sure if we posted in the correct position (like if we were sure about posting a transaction for a specific account, but we did not find it because we posted it wrong at the account of someone else.
So we can make sure about it by this advanced search).
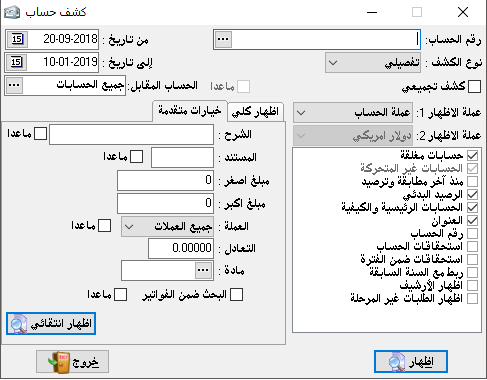
illustrative:
Here we can see a difference in display options available to show at the left end.
Here, we can show account details, the items of each invoice, and the appearance of a new box which is (required to be shown) and its details as follow:A separate complete transaction: it means showing all transactions made to this account in an illustrated way by the show options, but separately, the transaction of the goods first and then the entry transaction and without taking into account the dates in transactions.
Full sequential transaction: All transactions are shown in detail arranged by the date of each transaction and are similar to the detailed statement, but with a complete breakdown of the invoices and materials contained therein.Goods transactions only: it shows us the movement of goods only and in detail within each invoice and without showing any accounting entry.All transactions except for goods: it shows us entries movements from discounts, payments, and transfers…etc. without taking the goods into consideration, and taking into account the dates of entries and other non-material transactions.The purpose of these four previous options is to facilitate the auditing of the accounts and match them, for example when we are matching with a customer if we choose the statement on the basis of showing all transactions except for goods, we can easily match payments and discounts and as a second stage we can choose goods transactions only to match it.The show options:- Material number: In order to show the card number of each material contained in the statement.
– Invoice number: In order to show the number of each invoice in the statement and link it with its materials so that it is a quick reference as this invoice contains only items listed below it (increase in the clarification).
– Invoices shortcut: we’ve already mentioned that to use invoices shortcut feature, you must put the mark (*) In the first note field on the invoice.
This would show us the name of the invoice and its value only though we chose the type of statement is illustrative, and the other invoices that we did not place a mark (*) it will appear in full detail.
– Show quantity: the quantity of each item appears next to its name in the statement.
– Price: the price of each item appears next to its name in the statement based on the price recorded in the Invoice.
– Show unit: which specified in the card as the default unit.
– Show invoice total: the bottom of each invoice shows a total value and this makes it easier to distinguish invoices from each other.
– Balance movement: to show the balance value, and its nature debit or credit after each transaction on the account, and no matter what the transaction is.
This makes it easier to match the account faster.
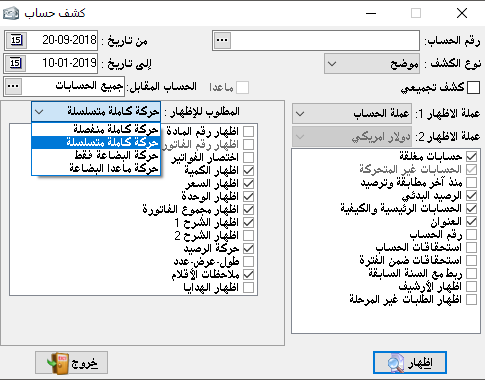
Gross statement:
Here we do not see any details in the account but only the account number, account name, and current balance without clarifying any transaction, and when we choose the gross statement, we take advantage of it to print a list of sub-accounts balances, for example, if we choose a gross customers account we will have a list of all customers’ balances together and each customer with his balance next to his name

Gaily gross statement:
It shows us the current balance of the account in the same previous show but for each day separately during the selected period. We have a choice that appears when we choose this type of statement and it shows the days that do not contain a transaction.
5- Monthly gross statement: the same as daily gross statement, but it is for every month.
– Along with all of these options, we can see two options:
– The show currency 1: it is fixed with all types of statements where we can show the account statement in two currencies whether the transactions are completed in the Syrian pound or in any other currency.
Where the program calculates each transaction based on the selected currency and the equivalent average rate on the date of this transaction.
And for transactions in the selected currency will remain on the basis of the actual rate we have recorded, in addition to the possibility of showing each transaction in the currency in which it was posted and the other show currency is any currency we choose.
This would benefit us in matching with our banks abroad or with our overseas customers, especially since we are often accountable to them for transactions in their local currencies (or as agreed).
The differences that resulted from using different currencies will be explained in a later section.
– The show currency 2: it is similar to the show currency 1.
– The opposite account: It is the second party of the entry, whether the entry related to an invoice or not. It is mainly useful in knowing transactions between customers, like show a certain amount has received from a customer to cover a debt to another supplier.
It is also used to show special discounts. We, therefore, take advantage of this option to find an account statement that shows a relationship between two specific accounts.
For example sales account and for cash sales, we put the account number at the top of the sales account and the opposite account is the cash account (or bank).
This will isolate sales that have been made in cash immediately from deferred sales, that when we are using one account for sales and without dividing accounts between sales to cash and deferred.
We can apply this case on many other cases and accounts that facilitate the work while maintaining the same results.
Special balances:
We have already mentioned the special balances and how its use would facilitate the linking of some accounts with each other which have the same properties, for example, customers of a particular region, specific material customers, or a particular group of materials.
or clients in a particular currency or customers for whom a specific employee is responsible, like if he was committed to pursuing the collection and delivery to that customer group only.
We can name these accounts as we want, and we have nine balances that we find in the miscellaneous section, then the program constants, and then the general constants.
Where we can add a list name at any time, when we specify the number of balances is three we see that three lines have been created to write the names of these balances.
And after naming we save it.And then if we go to the account card we find that these balances are included in the card and from this, we know that to link a particular account to a particular balance, we must place a mark on its card near the name of the balance which we want.
And suppose that we named (Northern customers) and customer number 1 from this area so we go to his account card and put the mark in front of the customers of the northern region and so for the rest of the accounts.
To use this feature, we go to the balances section and then the special balances showing all the balances entered by us in addition to the account balances section.
– List name: it is the list we choose based on our previous knowledge about its classification.
– Account number: it is only activated in the account balance, and will be explained later.
– Account type:We have three options:Show debit and credit accounts.
Show only debit accounts.
Show only credit accounts.
– The date of the last payment: here we determine the date we want.
And its purpose is to know whether this customer has paid us or we paid to him since that date or not, to determine whether his claim is valid now or not.
– The date of the last payment from: it is to clarify whether or not the movement of goods has been carried out since that date, to determine whether his claim is valid now or not (for example).
– Invoice type: it is determined to link it to the previous section and it, of course, determined by the nature of the client’s account.
– The debit balance is greater than: as the primary purpose of the special balances is to determine the appropriate time or use it as a reminder to claim payments or reminder of payment due to suppliers.
We may have clients whose balance is not too big and it is not tacted to ask them for payment (this is for personal discretion).
From this section, we can select a certain amount for the debit account so each customer above this amount will be asked for payment and so on.
– The credit balance is greater than: same as the previous paragraph with other terms.If we choose the name of the list account balance and here we have neglected the link we have made between the accounts through the special balances.
And we asked to show the same options but for a particular master account, where a sub-account cannot be used here, and the first benefit is that there may be a creditor customer in one of these lists which we named and so if we ask to show this list and only the debit accounts, this account will not appear either if we take account balance of the total accounts of the customers, it will appear with credit and debit balance.
It also benefit when we increase the number of special balances, we have 9 balances where we define qualitative accounts to link it to the accounts that we want and then ask from the special balances section the account balance (the desired qualitative account) and therefore we can obtain an unspecified number of special balances

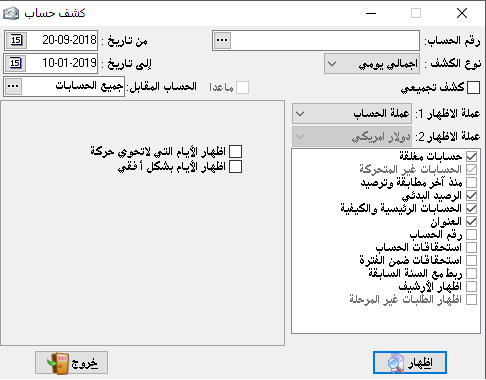
Trial balance:
This item is mainly required in order to compare debit and credit balances, i.e. between customers, suppliers, expenses, and revenues to estimate the financial position. The trial balance is very necessary at certain periodic intervals, which may be daily, weekly or monthly. And according to the responsible accountant, it shows the financial tie in the organization. Including expenses and revenues, this is the main difference from the balance sheet as it does not show the expenses and revenues, and we can take the trial balance for all accounts when we do not specify a number for the account and we may take it to a particular primary account, secondary account or sub-account.
It is very important to estimate the size of the development in the accounts with different classifications, for example, a monthly trial balance showing us the increase or decrease in expenses and revenues…etc
The trial balance replaces the balance sheet when we take it at short periods for a week or a month…
– Scope of the show: it means we can depend on the date of the entry during the selected period of the show or on the numbers of these entries, there may be a specific entry number dated in an earlier period. We do not want to show all the accounts include in this period.
– The show currency: we can choose the currency in which we want to show the trial balance, which we have already entered it from a miscellaneous section and then currencies.
– The show levevl:
If the level is (0) it means to show all accounts.
If the level is (1) it means to show primary accounts only.
If the level is (2) it means to show the accounts which its code consist of two number or less.
If the level is (3) it means to show the accounts which its code consist of three number or less.
– Show fields:
– Account number: it is the account number that is required to show.
– Show subtotals: it will show a special field for debit total and credit total, and it is the totals of all transactions that took place during the month.
– Show first period balance: it means the balance that was the day before the selected day.
– The show options:
– Show sub-accounts: which are sub-accounts of the sub-accounts.
– Show closed accounts: the accounts with zero balance.
– Show moving accounts: This option is prepared if we activated the closed accounts option and if we do not, we can choose it or not and it is used only to show the accounts that have been moved or have a previous balance.
– Include the opening balance: it means adding the opening balance to transactions and showing the final balance.

Closing accounts:
The closing accounts are the final result of business operations that took place during the financial cycle as it reflects the outcome of the business during the period.
The special here is that we do not need to create these accounts, but it composed and organized automatically and based on prior identification of the card of each account of the posting section.
Where we find some accounts are posted to the operating account which related to industrial processes and accounts posted to the trading account.
And profits and losses…etc.

Operating account:
If we take the operating account impartially or imagine that we are dealing with it manually we find that what is included in this account is only related to raw materials, direct industrial expenses and accounts of the movement of raw materials.
All accounts and transactions related to the industrial activity are included in the operating account and this means that it has nothing to do with the business, administrative and financial matters of the organization. From this, we conclude that the operating account shows us the cost of the goods produced.
And of course, this concerns the industrial program for plants and workshops However, it can be used in Al-Edari program if we wish to control an uncomplicated industrial process. The accounts which should be closed in the operating account we should choose where to close it in its card.
The logical sequencing of the cost of the products requires that this price, which represents the balance of the operating account, be posted to the trading account. This is done automatically and without the need to write a particular accounting entry or open special accounts to close the operating account balance in the trading account
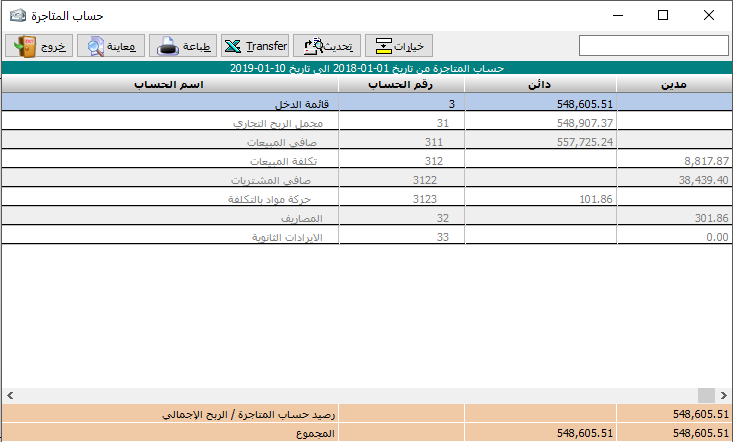
Trading account:
The first number in the trading account is the balance of the operating account that represents the cost of the products, if we are in an industrial facility and we use the operating account.
The underlying accounts that are included are all accounts and transactions on the finished goods, including all procurement expenses (as per the French method of accounting).
But we are in the proposed chart of accounts with the program we relied on listing the transactions of the goods ready for sale only and we left the purchase expenses to be included in the profit and loss account. And the best way for it is back to the owner of the organization or the investor of the program.Thus, we find here the accounts of purchases, their returns, the sales account and their returns and the account of the remaining finished goods at the end of the period, and finally shows the balance of the trading account which is either total trading loss or total trading profit and then it is posted to profit and loss account As a logical result of the closing sequence.
Profit or loss account:
The first number to be found in this account is the balance of the trading account, whether total profit or total loss.
We then find the accounts relating to expenses and revenues.
Whatever the type of these expenses and revenues, and of course should not be related to manufacturing or raw materials, for example, salaries, wages, transportation expenses, shipping and clearance expenses, administrative expenses, electricity, water, telephone, etc.
In the profit or loss account, all expenses incurred in the organization are subtracted from gross profit or loss, and all revenue is added to this total to result in our net profit or net loss, which is transferred to the final balance sheet and without the need for a special entry.
Current balance sheet:
It is the same as the final balance sheet if we request to show it at the end of the current period. The balance sheet shows all the assets and liabilities, i.e. all rights and obligations, from fixed current assets, goods, cash, trade receivables, trade payables, loans, capital, depreciation allowances, and net profit or loss. Of course, the current or final balance sheet must always be balanced.
Unless there is an imbalance in the opening budget. In Al-Edari program we can get a general balance sheet every moment and after every transaction, if we want to.
The balance sheet, in general, clarifies the financial position of the company as the result of differentiation between the assets and liabilities if the assets appear more than liabilities, it means that the financial position of the company is good, and thus it is in a profit position, or if the opposite it is in loss position.
All figures appearing in the balance sheet are balances for the accounts that the balance sheet configured from.
As a result of business operations during the year, it is the final conclusion of the work.

Opening balance sheet:
This balance sheet consists of the rounded balances of accounts and the balance of the warehouse from last year.
We can prove this balance either through the rounded balance field on each account card or by typing the opening entry.
Of course, if there is an imbalance in the opening balance sheet, it means that the imbalance will continue to the end of the financial period.
And means that our final accounts and results are inaccurate.
The opening balance sheet is the basis on which we will pursue our work.
– The blank rectangle next to the closing accounts is used to extract a closing account for a particular master account where we can make a balance for this master account independently of other accounts.* Show:
– Sub-accounts: it means showing or not showing sub-accounts.Sub-totals: it means showing or not showing totals of sub-accounts.Closed accounts: it means showing or not showing accounts with zero balance.
From date to date: Here we can specify a specific date for the final account to be shown, so, for example, we can know the amount of profits that have been made within a month. Or we can know the financial position within one month or one week only (for example).
The show level: To which level of the account number will appear in the balance sheet. If we choose number 4, all accounts whose number consists of 4 digits or less will appear. And each account that increases the number of digits of its card number from the four does not appear in the balance sheet.
Hide level 1: This means not showing primary accounts, which its account number consists of one digit only.
Then we press the button to show the desired closing account according to the options chosen previously.a

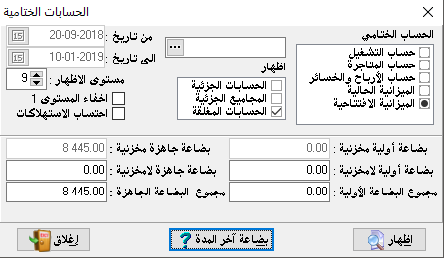
End period inventory:
This button shows us the balances of the goods as reported in the warehouses and with the figures to be reflected in the final calculations.
– Raw materials inventory: means the value of raw materials or materials for the manufacturing process.
– Raw materials non-inventory: The value of the raw materials non-inventory which are specified in their cards its type non-inventory.
And here if we have such materials, the program must calculate their value and place them in the designated location.
To be taken into account when calculating warehouse balance and therefore profit and loss.- The sum of raw materials: it is the sum of raw materials inventory and raw materials non-inventroy and it is calculated automatically.
– Finished goods inventory: it is the value of ready to sell goods and it is calculated automatically from warehouse balance.
– Finished goods non-inventory: it is for trading goods but non-inventory, so its value must be known and inserted in a specific field to be considered by preparing financial statements and calculated profit or loss.
– The sum of finished goods: it is the sum of finished goods inventory and non inventory and it is calculated automatically.
Create invoice:
to enter materials movements, go to invoices and then create an invoice.
Invoice type: and here we have the following types:
1- Purchase invoice: it is used to prove goods procured from suppliers to warehouses.Purchase return invoice: it is used when we return goods to suppliers.
Sales invoice: it is used to prove sales and goods transfer from the warehouse to the customer.
Sales return invoice: it is used to prove the process of returning the sold goods from the customers.
Input: its main use in workshops and factories to prove the input of manufactured goods from the production line to finished goods warehouse, or to correct the inventory.Output: such as input is used to prove the output of raw materials from raw materials warehouse to the production line for manufacturing, or to correct the inventory as well.
Transfer: we find it only if we have more than one warehouse, and this is determined by the program constants and general constants. Invoice number: we can set the invoice number manually and we can leave it automatically, or we can specify a special number. Also, we can specify a number for the billing notebook and list the numbers of its invoices for each individual notebook.- Date: it is determined by the transaction date.
– The second party: it is the name of the account you are dealing with based on invoice type. If the transaction is in deferral, we will mention the name of the client, and if it is in cash, we will mention the name and number of the cash account.
In all types of invoices, the other is the second party.
– Name: it is not linked to the accounting process, but for a statistical purpose to clarify the name of the recipient.
– The warehouse: it is used to determine the location of goods, if used here means that all goods included in the invoice are located in the same warehouse.
– Discount ratio: it is the discount ratio allowed to each item in the invoice, and is based on the predetermined rate of the item on its card.
– Sales price: we have noticed in the material card several prices for sale, and here is the actual use of it, where we determine the price we use for each customer to create invoices based on it.
– Notes: it is mainly used if we choose the automatically numbering, so we can mention here the number of the original paper document in order to link the paper document to what is recorded in the program or invoice number in the program.
– Material number: of course, it is not assumed to remember or know the numbers of all material cards because it is difficult.
So, we can query the item number by pressing F2 where the search window appears in the number or name, we type part of the item name may be three characters it is enough.
Then we choose the appropriate search method, press OK, the required material appears and then press OK so the number, name, and predetermined price appears, and so for the rest of the materials.And you can search for the item in another way.
Go to the item name section in the invoice and type part of its name and then press ENTER or F3 to show the required item.
– Material name: it is not possible to write in it unless we request it from the constants of the program, we can go to invoice format and then modify the name of the item.
– Quantity: it is the quantity sold or purchased based on the transaction, and we can note when the indicator is standing on it, it will appear at the bottom of the invoice the balance of the item in the warehouse, and this is useful to know the possible use of the item.
– Price: it automatically appears based on its previous selections.- Total price: the result of multiplying the quantity by the individual price.
And we can input the total price and the quantity so the individual price will appear immediately.
(Note: when the price appears in the invoice this does not mean that we are obligated to use this price, but can be adjusted as needed and directly)We can note in the table corner in the invoice, next to the material number, a rectangle.
if we double-click it additional options on the invoice will appear. And those options as follows:
– Distributor: it means the account of the person who sold the invoice in case we adopted the commission method for distributors. And we should mention his account number in the chart of accounts.
– Item discount ratio: when we activate it, the total discount ratio at the top of the invoice will be canceled, and a new column will appear in the invoice that is a specific discount for each item.
– Salesman: he is not the distributor, the salesman is the one who performs the sale inside the shop or the company, so the commission of distributor calculated based on sales and collections, while the commission of the salesman based on sales done because most of them are in cash. And in the end, it is due to the internal policies system of the company.
– Warehouse: when we activate it, the effect of the warehouse at the top of the invoice will be canceled, and a special column will appear where we can determine a specific warehouse for each item within the same invoice.
– The second and the third unit: it means selling items based on other units
. And here the program determines the quantity of the other units automatically after activating this option from the program constants in the section of invoice format.- Gifts: here comes a special column within the invoice to record free quantities obtained as a result of the purchase or granted at the time of sale. And it has its own accounting method.
– Discount ratio: it is not the discount ratio for all items that are placed on the invoice with a fixed rate for each item. But this can be determined for each item separately.
– Individual commission: there appears a special column within the invoice to register the commission granted to the distributor for each item.
And it can be different proportions from one item to another.
– Trading account: it is used when creating individual transaction accounts for each item. So, the entries for each item will be written based on specific calculations.
– Salesman: it is not the salesman at the top, where here a special column appears within the invoice to register the salesman in front of each item. And this allows registering one invoice with more than one salesman at a time.
– Length – width – quantity: it is specific to the businesses that sell goods counted on the basis of area. Such as carpenters and sellers of glass where the area of the material is determined (45.5*30*1) and equal to 1
.385 square meters of glass.
Then it is multiplied by the price of the square meter and so we will have the price of the goods sold.
– Tax: where the tax is calculated by a specific ratio on the invoice, and then placed in the chart of account as an accumulated tax account.
– Shipping company: it is used to link invoices always with the shipping company.
In case the shipment against the payment, the value will be transferred to the shipping company account.
At the bottom of the invoice, we find accounts necessary for the accounting adjustment of the invoice.
And it appears automatically after we select them from the primary accounts within the program constants.If the add section or new section is not activated, it means that the invoice accounts are not complete or there is an error.
Additional fields button: shows us the following options, so the invoice will appear as follows:

Here we can find:
– Delivery: it means the method by which the content of the invoice will be delivered. Whether immediately, with the assistance of a person, or by a particular vehicle.
This section has no accounting linkage, but only for statistics.
– Shipping method: the way in which the goods are shipped by land, sea, or air shipping. And if it is against payment or not.
Also, this section has no accounting linkage, but only for statistics.
– Shipping, customs, and other fees: it is categories of extra charges on the invoice.
Where each one will be carried on the related account.
And in the end, it will be carried on goods to calculate costs accurately.
– Special mark: it is a special mark of goods in order to distinguish it.
And to ensure that it is not confused with another shipment at the time of shipping.
Or to distinguish it by the customer so that we can prove this mark of goods when we have an issue about it.
– Order number: here we place the order number under which the goods were ordered.
– Offer number: the offer number sent by us to the customer (for more assurance).
– New and add buttons: are used to save the invoice and going to a new one.- Edit button: it is used to make modifications on the invoice.
Where we request the invoice from the section of creating an invoice, and by the number and type we can access the invoice. And then we can make the necessary adjustment.
And after we finish we just press the edit button to save our modifications.
– Delete button: it is used to delete invoices.
And we can delete by pressing on the button delete from the section of entering invoices after opening the invoice according to its type and the same number.
Notes 2 section: to record more information and notes.
Show invoice:
It is used to view an invoice.
We have a lot of options to show, so we select the option we want, such as warehouse name, item name, or invoice number…etc- Unit of the show: as we found in the material card there are 3 units. We can show the invoice by the unit we want and also show it at the price we want which we have already specified in the material card (we can find here almost everything related to materials and requires proper preparation of the material card).
– The currency of the show: we can choose the currency in which we want to show the invoice provided that we have already entered the currency from entering currencies in the miscellaneous section.
– Another price: we can add another price to the invoice and it is of course based on our pre-identification in the material card.
– Show address: it means the address of the account holder whos the invoice produced to (the second party).- Show number: here we have the option to show the material number, registration number or barcode number.
– Design print: we can add our own printing form, where we can use it when we want and we are able to use the original form from the program.
– Warehouse: it is the warehouse from which the goods moved based on the invoice.
– Unit name: it is the sales unit like (Kilogram, Meter, Piece,…).- Material number: the material card number which included in the invoice.
– Material name: it is the name of the item.
– Quantity by unit 2: which is predetermined in the material card.
– Quantity by unit 3: which is predetermined in the material card.
– Materials discount ratio: if a discount is made to an item in the invoice, the ratio of this discount is shown here.
– Invoice discount: the total discount on the entire invoice, which is written at the bottom.- Payment: if payment was done and proved on the invoice.
– Account balance: the client’s account balance regarding this invoice.
– Sum of quantities: the sum of quantities of all items and even if types differed.
– Entry number of the invoice: it is the accounting entry number which automatically generated for this invoice.
– The amount in letters: invoice amount in letters like only one thousand and fifty dollars.- Tax: it is the tax amount deducted from the invoice value.- Conversion factor: means the conversion factor between the first, the second, and the third units.
– Mini invoice: this option requires to place the mark (*) at the beginning of the notes field in the invoice, where it appears to us in short form and without detailed items.
– Free quantities: it is the bonus which explained before.
– Receipt voucher number: if the invoice payment method is by bonds so it shows us the voucher number which generated for this invoice.
– Shipping notice number: it is the shipping notice number of the shipping company whether it was issued to us or from us.- Length, width, and quantity: this, of course, is different from the first quantity or unit, and it specializes in some special businesses. If the invoice was written in this way it will show us.
– Show payment method: while we can create our own payment methods (from program constants) it is very important that we indicate how the invoice will be paid when we request to show it for printing.
The four arrows at the bottom are each with a purpose that is indicated by the dialog box that appears when the mouse is pointing on it.
The first in order to go to the last invoice of the same type, the second to go to the next invoice, and the third to go to the first invoice of the same type mentioned at the top.Note: when we choose the type of invoice is transfer, we find that the show options have changed to fit the transfer invoice.

invoices review:
It is used to sort and match invoices with clients and by the type for a specific period.
– Account number: it means the name of the client.
We can choose the account of the total customers for example or the customers of a particular region, therefore we can put any major account here.
– The currency of the show: it means review invoices by the currency that we choose even if these invoices were not created by the primary currency.
– Shipping company: it means to show the company through which goods were shipped, of course, that after proving it when the invoice was created.
– The show form:
1- Total: it shows us invoices without details.
2- Detailed: it shows us the items of each invoice in addition to other required show options.- Show invoices by: number, or date.So from invoices review, we can find invoices of a particular customer, and by a particular type of invoices, or for various types, and in a specific date totally or detailed.
– Show name: it means the name that written in the invoice next to the second party.
– Show invoices by other currencies: when we choose to show at the top we choose a specific primary currency, therefore this option can show us invoices which not created by the primary currency.
– Show notes: the notes written in the invoice.
– Unpaid invoices: we’ve already talked about the paid invoices feature and this option will show us the outstanding invoices.
Show the payment and the rest amount: show paid amounts of the invoice and show the remain amounts which not paid yet.
The second step in defining the program for our activity relates to the materials.
Where a card must be created for each material and whatever type (this can be determined depending on the nature of the project as we are talking about a normal trading business), and each card must take a certain number.
We go to the title of materials and then to the section of creating a material card to do so.
insert a material card:
This is where we define the materials and items that we are trading by, so each item must have its own card and each of these cards must have a number and name and specifications according to the following:Material number: which is the number of the material we want to insert and suppose for example it (001).
Material name: for example, men’s shirt model number (420), the second line is used to complete the item name or to mention the foreign name of the item.Notes: it is specific notes related to the material; it appears within inventory reports only.- Material type:
1- For trading: when its nature is for trading only, it was purchased to sell it only.
2- For manufacturing: when the item is a raw material and purchased to use it in the manufacturing process to convert it to trading material for sale.
3- Primary material: material containing several materials.
4- Primary material option: it is used for classification or building the chart of materials.
5 non-inventory:
a- without inventory control: used for materials that we don’t want to show in the accounting entries, and without a show of its quantity and value within the inventory. And here it never appears in the warehouse inventory.
b- with inventory control: when its quantity and value appear in inventory, but without accounting effect.Barcode: digital coding of materials (if the material has a code) and most of the materials and goods have barcode numbers.
And if they are not bearing the barcode, we can design barcode labels using Al-Edari, and the explanation will come in time.Registry number: used for low-quantity materials such as machines, which have a different production number than another machine.
It can be said that the registration number is the number of electrical products imported from abroad or the so-called order number.Classification number: our goods may have a specific classification that is linked to a particular sequence.Customs number: it is used if the goods are imported to link this material with its customs number.Group: it is used to allow the classification of materials into groups, which can be up to 3 groups.
And these three groups (or two of them only, or separately) can be linked to each other. The groups can be described from the section of constants within additional options.
Primary material: here we can dispense groups and make major primary material to include their sub-materials and arrange them in the chart of materials.
Level: it is used to identify the users who are allowed to deal with this material for trading or major use.
And in case of cancellation of a certain level, the material does not appear for this level either by query nor by reportsUnit: it is the way the material is sold by like (Kilogram, piece, bag, or bead…).
Decimal points: it is parts of the unit that the material sold or bought by, such as bag and a half (1.50) need to type two digits after the interval, (50 are decimal digits).
Unit 2: If there is another sale or purchase unit for the material such as (Ton, or bag).Decimal digits 2: Decimal parts of the second unit.
Conversion factor 2: it means how much is the first unit of the second unit (If the first unit is a kilogram and the second unit is a ton, the conversion factor is 1000, i.e. ton = 1000 kilograms).
If the first unit is larger than the second unit, we use division (The first unit is a ton and the second one is Kilogram 1/1000, the kilogram equals 0.001 tons).
Unit 3: same as unit 2.
Decimal Digits 3: same as decimal digits 2.
The conversion factor is always constant: it means if the conversion factor is always the same for the three units in a specific material.
Default unit: it means in which unit we depend as the basis for the equation among the three units.
Opening cost: material cost at the moment of transferring our data to the computer (the price depends on the default cost basis).
Fixed cost price: The price we choose as a default to calculate profit and losses on the basis of it, and without using the price of the average cost of the product.
Location: Statistically useful in knowing the location of the material in warehouses or on shelves without accounting linkage.
Minimum limit: it is the minimum limit of the material where it should not be beyond that limit in warehouses.
Maximum limit: it is the maximum limit of the material where it should not be above that limit in warehouses.Ordering quantity: Means the quantity for which a purchase order will be generated upon the arrival of this material at the minimum limit.
After we identify the supplier of this material on its card and once it reaches the minimum, a purchase order is generated from the same vendor.Supplier: here we mention the name of the supplier, who usually supplies us with this material.Gift: it means the bonus quantity which we claimed when we purchase in wholesale quantities such as medicines and cosmetics (every 12 pieces have 2 pieces for free).
Sales prices: it is the way in which the sales price of the material is calculated, this price is calculated based on the cost of the selected material and appears on the invoice automatically and can be changed.
If we chose a fixed price, each of these prices must be specified by writing it and if the price is a ratio each profit ration must be specified. Here the program calculates the actual or current average cost of the material and then adds to the cost a certain profit rate as specified for each price and the result appears in the invoice.
Cost method: The method by which the program will calculate the cost of this material, for example, the average cost (which is best suited for most activities) calculates the prices of the material multiplied by the amount at each moment.
and of course, this cost is used to appear in the inventory and the available accounts, and to recalculate profit according to this cost and after each movement on this material.Rounded balances: This section is used to input the rounded balance of the material at the moment we take an inventory in order to transfer our data to the computer.
The quantity is multiplied by opening cost on the basis of the first unit and the output is placed in inventory in the opening balance sheet.
Where this value represents the opening inventory.
Accounts in the card are the accounts necessary to control the movement of the material.
In some projects such as hospitals, for example, each material may need to have their own sales accounts and purchase accounts that are different from the rest of the materials.
It is not required to put all accounts but it is required to put the end of period inventory account. Without it, the add and save sections will not be activated.
If we want to delete a specific card, we go to the section of inserting a material card and request the number of the card we want to delete it and then we press the delete button. And of course, we cannot delete a card with movement because we will waste those movements and this will cause a defect in our accounts. So, the deletion is not allowed when there is a presence of transactions.
Therefore, we should delete the transactions first and then delete the card.
For modifying, request the material card from the entry section and correct the card then make the required modification and press the edit button.
* When we finished entering the chart of accounts and entering the materials and their data, we have established our project correctly.
And we can start our business in practically.
With the assurance that the creating of the chart of accounts and the chart of materials must be accurate and completely correct because if the start of the program is correct, we can shorten the time and effort of the work later.After we have defined the chart and the materials, we must make the connection between accounting and warehouses.
And that is can be done with the movement of goods between customers and suppliers and this transaction is proven through the invoices exclusively and therefore any movement on the materials must be proven by invoice or otherwise will not bind with warehouses.

Material movement:
The main section of it was explained, but the graph show as follows:
The graph show:
It is to draw diagrams for the movement of certain materials within a specific time.
So that it is useful to compare this movement during the chosen period by another period in order to know the evolution if it is positive or negative.
In order to study marketing, financing, storage, and supply plans.
It gives a very clear picture of the movement and development of material which is useful in preparing studies for the marketing and supply of materials and determining the seasons and periods when we must invest more, or in some seasons we must transfer the investment to other materials.
This prevents the accumulation of goods in some seasons and transferring funds to invest in another field, higher profitability, and higher marketing capacity.
– Material number: We can choose two materials to appear together on the axes of the coordinates. Because there is no clear vision for more than two axes at one level.
If we choose more than two materials, all materials are combined and shown in aggregate.
– Transaction type: We can choose the transaction we want from the show options.
– Statement type:
1- Overall statement: for all materials, it shows the average movement of all materials and as one mass.2- Detailed statement: It fits a material or two at most for the reason mentioned earlier, and when we select more materials it turns into an overall show.
– Statement period:
1- Monthly statement: It chooses the average movement within each month individually and is presented as a movement of this month. And that if all materials are chosen.
2- Daily statement: It chooses the average movement within each day individually and is presented as a movement of this day. And that if all materials are chosen.
– Type of the show:1- Show quantities: where the show is numerical and according to the quantities of the selected materials.
2- Show prices: where the show is based on the amount that materials moved by.
– Warehouse: we can choose all warehouses or one warehouse only.
– Date: to limit what to show for a specific period, even for one day.

Stagnant materials:
It is useful to know which materials and goods are not sold in an encouraging way.
And of course, this is a relative matter for the investor, the material type, the season or period. So it’s back to the investor’s discretion, in the end, to consider if the material is stagnant or not.
And in order to make the right decision we have the following options:
– Material number: By querying F2, we can choose one material, a group of materials, or all materials.
– Type of Recession:
1- Never moved at all: materials didn’t move at all either by selling nor by buying.
2- Never moved by selling: and the other movements are not taken into consideration.
3- Never moved by purchasing: and the other movements are not taken into consideration.
4- Never moved out: it means materials never moved out to the production line if the company is an industrial or semi-industrial establishment.
– Date: the date is specified by the investor.
– Sort the show: the arrangement of materials:
1- Automatic sorting by the material number or by the method selected in the warehouse inventory arrangement.
2- By the quantity of purchases: they are arranged incrementally according to the quantity purchased.
3- By the amount of purchases: they are arranged incrementally according to the amount of purchases.
4- By the quantity of sales: they are arranged incrementally according to the quantity sold.
5- By the amount of sales: they are arranged incrementally according to the amount of sales.
6- By the quantity of outputs: they are arranged incrementally according to the output quantity.
7- By the amount of outputs: they are arranged incrementally according to the output amount.And of course all of that regardless of the material number except in automatic sorting.
– The show options: We choose what we want to show by the quantity or value of sales, purchases, or outputs.
– Maximum recession (by quantity): Here we determine the highest quantity that we consider the material is stagnant if its quantity moves less than the limit.
– Maximum recession (by price): Maximum recession (by price): Here we determine the highest amount that we consider the material is stagnant if its amount moves less than the limit.
Materials movement report:
This report gives us a table in a horizontal way that shows us the total movement that has been made to the materials.
It gives us the transaction totals and each transaction separately (e.g.
total purchases, total outputs…).
The initial and final balances can be taken into account in this report.
– Material number: By querying F2, we can choose one material, a group of materials, or all materials.
– Transaction type: we can choose invoices we want to show and we can choose all transactions.
– Unit type: we can choose which of the three units to show on, and we can’t use more than one unit to show.
– Date: to specify the period in which the transaction is required.
– Warehouse: here we can identify an inventory of one warehouse or all warehouses.
– Options: it is about the details of warehouses. And it can be activated when we choose all warehouses, where the sum of each transaction is separated from each warehouse and appear independently.
And for the initial and final balance. It is used to show the firs and last balances in the report. And when we choose to show the value, the individual average value section is activated.Showing the unit will show the name of the unit next to each item.
And show the non-moving materials mean the materials that have not been made any movement and therefore we would actually benefit from the initial and final balance only.And about in/out transaction: show us the total of inward and outward, and whatever the type or name of the transaction.
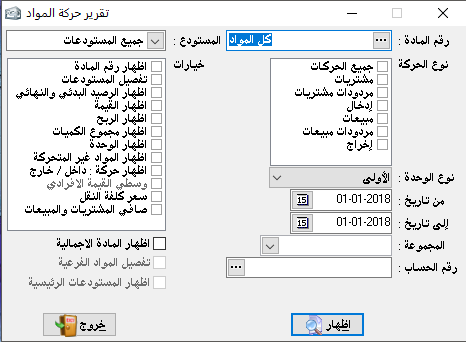
The most profitable items:
It is a statistical section in the program such as material movements report.
When the commercial transaction of the material is made and proven in the invoices we can distinguish what are the most profitable items.
And that in order to direct the appropriate investment for it.
Therefore the material whose profits are low and in case this item is not necessary to complete our products package we can then dispense with it, or reduce the investment and supply it. And of course this is due to the estimate of the warehouse manager or the financial manager.
While the determination of the material to be invested is relative to the nature of the material and according to the season and the personal discretion of the decision-makers.
– Material number: By querying F2, we can choose one material, a group of materials, or all materials.
– Material type: we can choose all types or one type.
– The most profitable materials by:
1- Ratio: it means the profitability ratio of the material.
2- Amount: it means the value or amount of profit regardless of profitability ratio.
– Show material number: we can choose the material number, registry number, or barcode.
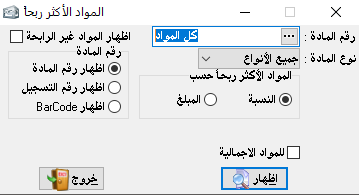
The best selling materials:
It works with the same mechanism as the most profitable materials, but with other results.
– Material number: By querying F2, we can choose one material, a group of materials, or all materials- Material type: we can choose all types or one type.
– The best selling materials by:
1- Quantity: it means arranging the materials descending according to the quantity of sales.
2- Amount: it means arranging the materials descending according to the amount of sales- Show material number: we can choose the material number, registry number, or barcode.
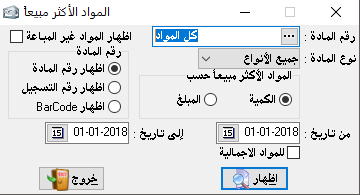
Modify the list of materials:
Changes to the specifications or prices of a particular set of materials may occur, whether cost prices or sales prices.
We may want to reduce or increase the value of materials in warehouses, or we want to make the warehouse balance zero for one reason or another. All of this can be done through the section of modifying the list of materials.
– Material type: we can choose all types of materials or just one type.
– Material number: to choose one material, group of materials, or all materials.
– The show sorting: we can either sort on the basis of the material number, its name, or without sorting.
Where the materials appear unordered and randomly.
– Unit: it means the unit to which the material relates. Whether it is the first, second, or third unit. And of course, it is pre-specified in the material card.
– Show the first name of the material: it is the name in the first line in the material card within the name field.
– Show the second name of the material: it is the name in the second line in the material card within the name field.
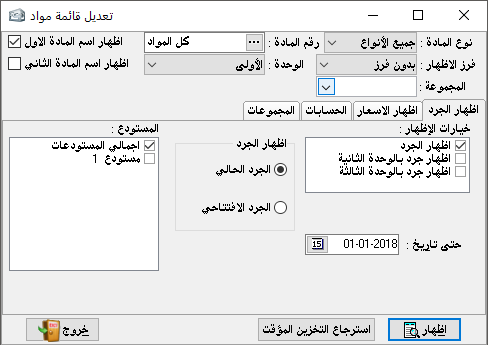
We can distinguish the following cases to use this section:
1- The first case:
– Show inventory:Here as shown in the illustration at the top.
Sometimes we may need to make the warehouse balance equal to zero, which is for regulatory purposes.
Or when we want to use the names of the materials and their cards in addition to using the same chart of accounts in a new company and without the current balances appearing. Then we have to delete the contents of the warehouse and rotate the files so we have a new balance sheet without materials balances only cards and names of accounts.
– The show options:
– Show inventory: it means to show the inventory of quantities by the first unit.
– Show inventory by the second unit: it means to show the inventory of quantities by the second unit.
– Show inventory by the third unit: it means to show the inventory of quantities by the third unit. – Show inventory: and we have two options:
1- Show current inventory: it means show warehouse inventory of the current day.
2- Show the beginning period inventory: it means show warehouse inventory at the beginning of the period.
– Warehouse: the company may have more than one warehouse, and here it has to be pointed out that when selecting the current inventory, the section of clear the contents is not activated unless the required warehouse is selected.
If all warehouses are selected, it will not be activated.
To date: we can determine the date to which the inventory to be erased, after selecting the general options, we should press on the show button and the following window will appear:following window will appear:Material number: it is the shown item card number.
– Material name: it is the shown item name.
– warehouse balance: it means the quantity available in the warehouse by the required date and required inventory type.
If we want to modify a limited number of items, we will choose the required items by pressing the left mouse button on the material number and its color will change. And if we want to choose all materials, there is no need to select anything, then we press the edit button to show us the following window:
– warehouse inventory: we write here the quantity that we want to be in the warehouse and for all the selected material.
For example, if we wrote (4) that means settling the warehouse to the quantity (4) for all materials.
If we want to erase or minimize the inventory, we leave it with the number (0) and then put a right signal in front of erasing and then we press on OK button. So, we will back to the screen that precedes the erasing screen but after adjusting the quantities as requested.Storage button: it means the storage of the implemented operation.
While the temporary storage button allows us to undo what we’ve done.
And when we press on storage button, the following window will appear:Where the quantities are adjusted by an input invoice and an output invoice, we must set up the accounts that will pre-adjust this operation in the chart of accounts.
The second case:
– Show prices: it is a very important section.
Through which we can set prices for a limited period for example or the prices of discounts…etc.
– The show options:
– Show selling prices: it means to show the prices specified in the card to sell the material.
– Show the cost price of the beginning of the period: it is well known for us which is the initial price of the material in the card.
– Show the fixed cost price: it is specified in the material card as well.
– Sales prices:
1- Based on the material card method: it means the method used to calculate sales price, i.e.
the ratio of the average or the average of the last purchase. Where the prices appear in advance, not the amount.
2- Fixed amounts: here the program calculates the price if the specified in the card is the method of calculating the price as a ratio.
Therefore, the price is will show on the basis of a fixed amount.Show prices: we can choose a certain price to show (all prices, wholesales price, semi-wholesales price, or retail price…etc) then we press on show button, so the following window will appear:Modify prices button: it allows us to modify prices as the following window:
– Round to the nearest: it means when the new price is calculated, this price will be rounded to the nearest correct monetary unit (for example, 5 monetary units, or 7 monetary units).
– Prices equal to zero only: it means to modify the prices equal to zero in the cards only or modify the prices in all cards, here we have the choice.
– The basic price: the price we will use as the basis for the modification, we can add to it or subtract from it.
And we can select it from the sales prices or cost list.
– The target price: which is the price field where the selected new price will be written after the modification. And in the card, it is one of the sale price or cost price.
– Modification method: it means to reduce or increase the price by a specific percentage like (5%), or by a fixed amount. This section is mainly important in clothing outlets because in the period of discounts it not possible to delay the customer in order to calculate the deduction granted on a type of goods.
Where the T-shirt discount ratio is often different from the pants…etc.
Therefore, we can choose the discount previously.
– Modification ratio: when we chose the modification method is by ratio, this option will appear and we can write the percentage that we want to modify prices by.Increase/decrease: it means adding the ratio to the basic price and writing the result in the target price.
Or subtract it and then write it in the target price.
Then we press the storage button.
For example, we can choose the retail price as the target price in sale period, and here we can depend on it as the primary price for sales, and this from the format invoice section.
And the modify button allows us to standardize a price or to erase this price according to the following window:Where the prices we have chosen appear and next to each price an erase section.
If we want to set a specific price, we will write this price in the field in front of it, so that the same price will be consolidated for all cards that have been selected.
If we want to erase this price, we can put a signal right on the erase section, so this price will be erased from all selected cards.
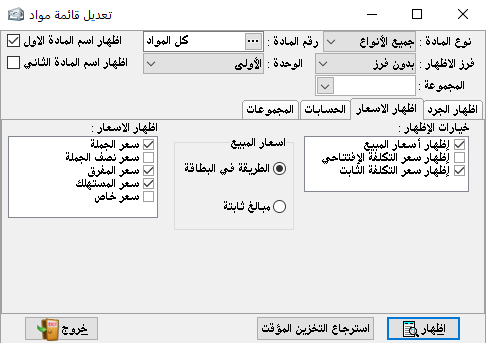
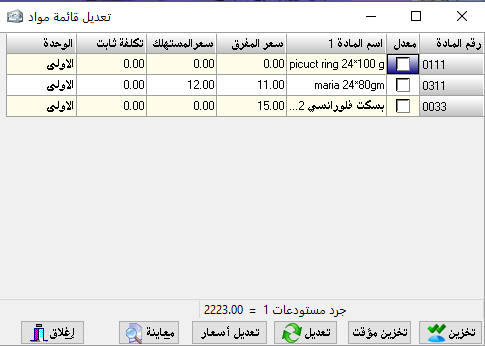
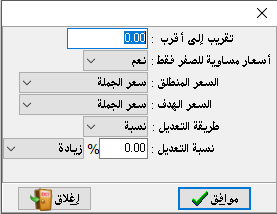

The third case:
Accounts:Previously we mentioned that the feature of the material accounts allows us to identify a special account for a group of materials or for one material, as sales account and purchases account…etc.We can modify these accounts or add certain items within the same classification.
Or we can modify the first or second name of the material.
Or we can modify the descriptions within the card…etc.- The show options:
– Modifying the name 1 and the name 2 of the material: it means to modify the name without having to go to the material card, especially if the amendment will be on a set of materials.
– Show accounts: it means to show the special accounts of each material next to the material name.
– The unit 1, 2, and 3: it is specified in the card, and appears next to the material name.
– Decimal digits: it is specified in the card, and appears next to the material name.
– Conversion factor: it is the equivalent factor between the units on the card.
– Conversion factor stability: we may be predetermined it as a fixed factor and we may not.
– Show notes: which are written within materials cards.- Show accounts:
1- The beginning inventory account
2- The purchases account3- The sales returns account
4- The purchases returns account
5- The sales account
6- The input account
7- The output accountAnd they are all specific accounts in the material card.
Then we press on show button after selecting the options: therefore, the following window will appear:Where the number and name of the item appeared with the selected options.
The modification button shows us the following window:Depending on the options required.
– Material name: to choose a material or group of materials.
– Inventory at
1/1 account: the beginning inventory account.
– The purchases account: the account prepared to prove purchases in the accounting process.
When selecting these materials and making the required modifications, the accounts will be settled in the selected materials cards as specified.
If erase is selected, it means to delete the material name or the account.
Then we press on OK button then storage to save the modifications.
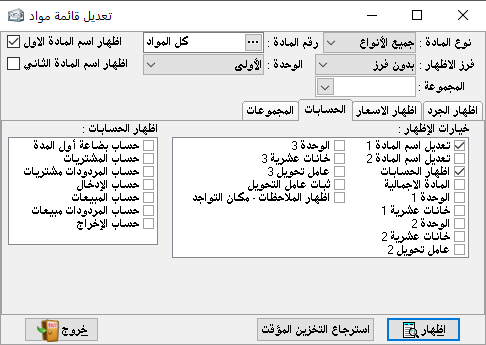
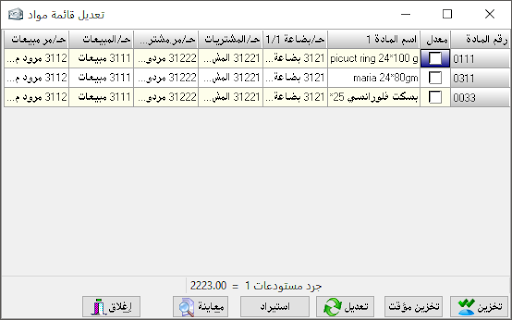
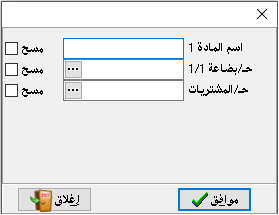
Beginning inventory:
A specific invoice is designed to input the opening materials balances when we start working on the program. By the form of beginning inventory invoice, we can input a material name, quantity, cost, and determining the warehouse if we have more than one warehouse.
Therefore we can input quantities of each warehouse separately or input a special invoice for each warehouse to have the inventory value which will be posted to the beginning entry as the balance of beginning inventory.
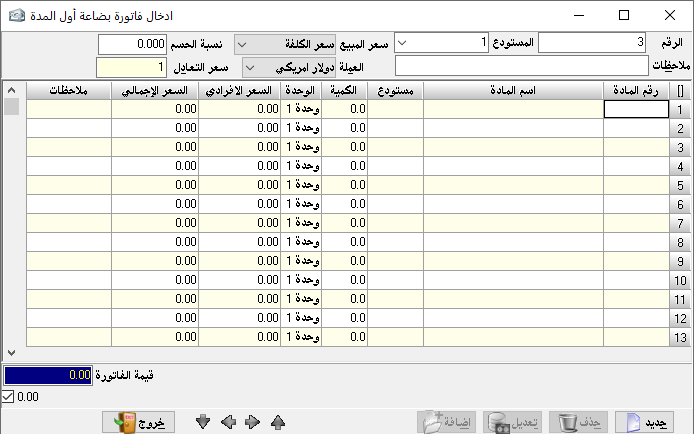
Warehouse inventory:
It shows us what is in our warehouses and according to the details of the materials.
– Material number: By querying F2 we can choose one material, group of materials, or all materials.
– Warehouse: here we identify one warehouse inventory or all warehouses.
– Cost method: means the method by which the cost of the goods will be calculated in the warehouse based on it, regardless of the options of the previous cost method in the material card, where the program here recalculating the cost based on the method required of it to show and at a time near to zero.
– Another method: Here we can show the inventory in another method in addition to the method specified in the previous line, and it also calculates the cost differently.
– The currency of the show: we can choose the currency in which we want to show the inventory, provided that we have already entered it from currencies input under the miscellaneous section.
– From date to date: To specify the period in which the inventory is to be shown, and can be for one day.
– Type of material: we can choose all types except the primary material, and here we can notice the importance of the non-inventory material.
– The show options: Determined at the desire of the investor, and based on the options presented to him.
– Material name: to show the name of the material in the inventory table, here we can select to show the first name of the material and its second name, through the constants of the program.
– Material number: its card number.
– Registration number:
The registration number on the material card, and here we either show the card number or the registration number where we cannot show them together.
– Barcode number: It is as the registration number.
– Closed materials: it is which has a zero balance.
– Unit: it means the sales unit, which is mentioned in the invoice.
– Total: it means to show the total value of each material (individual price*quantity).
– Prices: it means to show the individual price of the unit.
– Notes: which are the notes written in the material card.
– Calculate reserved quantities: When we register a sales order for a specific customer, we have the option to reserve quantities, and if we reserve the required quantities, they will not appear in the inventory, in order to clarify the quantities that can actually be sold through the required inventory.
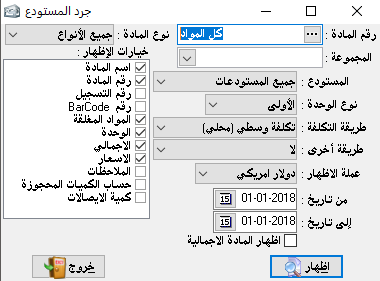
Materials inventory:
We have noticed in the warehouse inventory that the material appears at the cost price in the basic form, and can be shown at sales prices, either in the material inventory the materials only appear at sales prices, which is the main difference between them and the inventory of the warehouse, and useful when determining the permissions of passwords if we wish to prevent employees from having access to material cost.
– Unit type: Pre-selected sales and purchase units in the material card.
– Material number: By querying F2 we can choose one material, group of materials, or all materials.
– Date: To limit inventory to a specific period when desired.
– Type of material: we can choose all kinds of materials, and here we can also note the importance of the non-inventory material.
– The currency of the show: we can choose the currency in which we want to show the inventory, provided that we have already entered it from currencies input under the miscellaneous section.
– Method of sale: The price at which the material is to be displayed, which is predetermined in the material card and if we have not specified it appears zero, and can show more than one price here.
And the benefit of that we can print price list for our materials from here, where we can choose more than one price and offer to the customer.
All in addition to the rest of the show options specified in the application interface that does not need to be clarified.
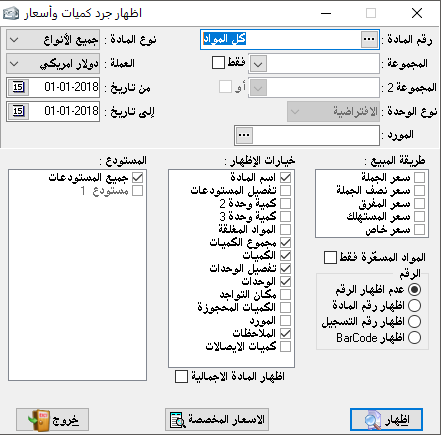
Excess material:
We found in the card of the material how we identified the two limits of re-ordering (minimum and upper limit), and this section would separate the materials that fall outside these two limits from the rest of the materials. And as per the request for the show.
– Material number: By querying F2 we can choose one material, group of materials, or all materials.- Required to show:
1- Exceeding the lower limit2- Exceeding the higher limit3- Ecxeeding a custom limit: Here we observe the activation of the last line which allows us to allocate a minimum limit and a certain higher and according to our desire.
4- Closed materials: And here it only shows the material with zero balance in the warehouses.
– Material number: it can shows the material number, registration number, or barcode number.
– Material type: we can choose all types.
This section in no less important than other sections, since we can determine the initial lines of the program from basic constants, secondary constants, names, and currencies rates…etc. and we will explain it in detail.
1 Choose files:
The investor may have more than one company or investment, and of course, it is preferable to have separate accounts for each investment of a different nature.
So it is preferable to create a chart of accounts, balance sheet, and complete financial accounts for each individual activity.
Al-Edari program allows us to create an unlimited number of independent enterprises or accounts.
This greatly benefits the general accountants and accounting offices as they have more than one customer and they must separate their accounts.
– In order to add and define new accounts or data for a new company that we talked about at the beginning of the explanation.
2- The program constants:
It can be considered as its backbone where the basics of the program are defined through it, as follows:Invoice format:We can find in it:
– Method of deduction: Some traders depend on the method of dividing in calculating the deduction, i.e. the Amount ÷ the deduction rate.
Or the method of multiplication, i.e. the amount by the deduction rate and the result is divided on 100.
Here from the beginning, we must define our preferred method and choose it as a basis for action, knowing that we can change it as we want without retroactive effect.
– Sales invoice commission: We use this section to calculate a commission for the distributor or salesman that works for us if we adopt this method.
When we choose one of the two methods (fixed amount or ratio), we see this option appeared in the sales invoice after choosing the Distributor section from the additional options in the Invoice (the rectangle that is located above the number (1) and near to the material number).
So, the commission is calculated and proven by the following entry, the debit account is commissions and the credit account is the distributor and this entry is automatically generated after mentioning the name of the distributor.
– The show options:
– Find the latest price automatically: Here we can search for the price at which a specific item was sold or purchased and related to the same client exactly.
When the process is repeated, this price automatically appears in the invoice that is made with the same account (client), which is useful for fixing the price with the same client for the same material automatically and changing it manually when needed.
– Allow the negative balance of materials: it means to allow material to appear in the warehouse by a balance below zero, i.e. we have sold more than the existing quantity. Which, of course, occurs mainly if the goods are entered into warehouses and the purchase invoices have not been recorded yet.
– Merge similar items: It may happen and we write in one invoice the same material more than once.
For example, if the customer requested 50 pieces, and then he requested an additional 10 pieces.
We shouldn’t adjust the quantity on the paper document, but it is preferable to write the material again by additional 10 pieces. And when posting to the program, the program merges these two items into one item by (60) pieces.
– Modify the name of the material: it means to allow modifying the name within the invoice and during the writing of the invoice without affecting the material card but only the material name within this invoice.
– Quick invoice: It will speed up the writing of the invoice. It is enough to input the name or number of the material by a quantity of (1) and the price automatically will appear from the material card.
– Ask When if the sales price changed: in the invoice we noticed that the sales price (wholesale price, retail price…etc.) is predetermined in each material card.
This section would warn us if we wish to modify the sales price within the invoice while we are typing it. And if we want to apply the price to the entire invoice items or on items that are written only after the price change like if the previous price was wholesale price and then we want to convert it to the consumer price.
– Automatic print after storage: Here the print window for the invoice appears immediately after storing it according to the general invoice form.
– Automatic printing by design: It means printing the invoice according to the special design that we described after storing it.
– Invoice discount rate in the entry: here, the discount rate given on that invoice is shown in the description of the entry.
– Invoice entry: It is useful if we have specified different accounts to control the movement of each material (MATACC).
Where when selecting the entry explained shows us the entry related to the movement of each material and in detail.
Where the explanation mentions the invoice number and the name of the material sold in front of each account.
And when selecting the type of detailed statement of the accounts related to the materials and without clarifying the invoice number in the description.
– Approved sales price: The price we will choose to be the base price which automatically appears in the sales price section of the invoice and permanently.
Unless it is changed from within the invoice manually and is usually determined on the basis of the most used price, in retail stores we put the consumer price, for example.
– Price accuracy: it means how many decimal digits to show in the price and value of the invoice, like parts of the SYP.
– Sellers names: Here we can select up to (29) sellers to mention their names here and without an accounting or even a statistical link.
Where the seller who made the transaction can be mentioned on the invoice in order to know the transactions of each seller.
And the material movement with a particular seller. and it is useful in determining sales of each seller for example (worker) if we calculate a commission on his sales.

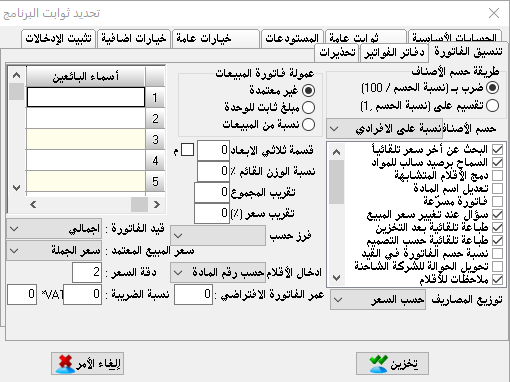
3 General constants:
– The number of special balances: explained in the account entry section.
– Periodical back-up by days: Here the program reminds us of each specific period to make a back-up of the data, to protect it from damage when the disk is damaged due to any reason.
– The fixed back-up by days: here The program automatically makes a back-up of the data regularly on the hard drive and according to the period specified for it.
– The number of back-ups before keeping a back-up: The number of back-ups that we make manually before the program makes a back-up on the hard drive.
– Entering rounded balances: described in an account entry section.
– The effect of procurement returns on the cost: In the event of returning purchased goods, does the program have to recalculate the cost of the materials after the goods have been returned or not.
– Approved cost method: The method that the program uses to calculate the cost of the inventory.
Thus calculates the sales profit and can be changed at any moment and accordingly the cost and profit adjustments are made.Approved Inventory Method:
a- The year-end inventory: it is the main method used in practice.
b- Continuous inventory: we must modify the chart of accounts and add the necessary accounts to use this method in the inventory.
Where we directly notice the appearance of the sales cost account in the sales invoice.
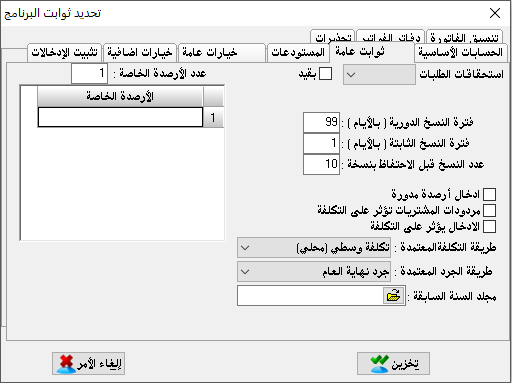
4- Main accounts:
It is used to determine the main accounts in the program so whenever it is necessary to insert an account from these accounts it is written automatically.
For example in the sales invoice if there is a payment, it is automatically recorded on the cash account unless it is changed manually.
Thus for the material movement accounts of sales and purchases automatically prove in invoices and so on.
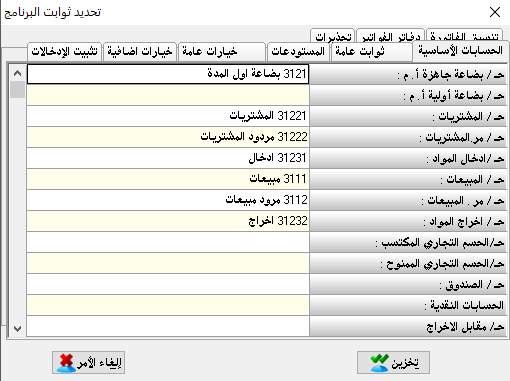
5- General options:
– Show accounts:
a- Sort by number: it means to arrange the accounts in the chart of accounts by account number.
And also arranging them in the total account statement for a master or sub-account by the account number.
b- Sort by name: the same as the previous order but by omitting the account number and approving the alphabetical sequence- Show materials: show materials in warehouses when requesting inventory, by:A-material number B-Name of material C-registration number D-Barcode number.
– Account help: it means arranging the accounts when we request a query by using F2 by account number or name.
And auto search within the number means (find the number required under all account numbers).
Showing the balance is meant to show the account balance next to its name when we query it and we can notice the option to hide the settled accounts as this does not show us the account that has zero balance in the query.
– Material help: what applies to accounts applies to materials with different terms.
– Cost price accuracy: it means the calculation of the price up to the parts of the SYP and the specified decimal digits.
– Automatic printing of a post-storage entry: it means printing the entry immediately after storing or not printing.
– Enter help: We notice that in the query using F2 we choose either F3, F4, F5 or F6 as needed and here we can set up the Enter button to place one of the previous options in the search for ease and speed in search as the investor is usually accustomed to pressing the ENTER more than other buttons.
– Show material name: It is meant to be shown in all statements related to the material like movement, inventory and movements report.
We can show the first or second name in the material card or both of them.
– Show account name: what applies to show the material name applies to it.
– The first name is Arabic and the second is English: for materials where the program depends on when the language is changed the first or second line to be considered the foreign name..
– The material number is Arabic: it allows typing and dealing in Arabic letters in the material number.
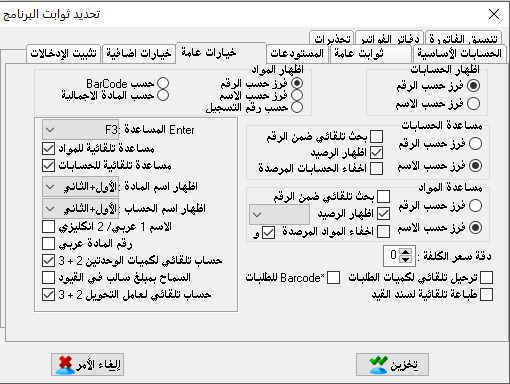
6- Inputs confirmation:
In order to safeguard the security and confidentiality of the data, we must protect it from modification.
This section would prevent any modification of the data as the data entered before the date of confirmation will not be modified or canceled in any way.
So we must be careful in dealing with this section and choose the appropriate date for confirmation.
If we want to make any changes to this confirmed data, we must contact any of the software agents and by the owner of the copy personally.
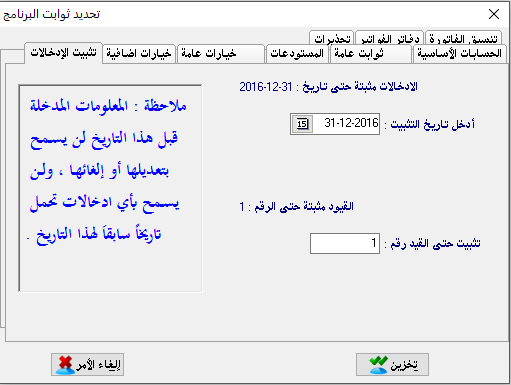
7- Warehouses:
This window is specific to the warehouses of the company. In the case of more than one warehouse, we specify the number of warehouses and input the name of each warehouse or its own number. And cannot switch the arrangement after the entry of the inventory.
Because it will entail the transfer of materials and operations carried out from warehouse to warehouse.
And if there are several branches and each branch has warehouses and stores.
We specify the names of the main warehouses for each branch to obtain an inventory of the entire branch warehouses and reports for each branch in the event of a link via the Internet.

8- Users management:
In order to preserve the confidentiality and security of information and data, it must be protected against interference by any person who may effect on it or be informed of information not entitled to know it, like the budget and costs. So, we have the management of passwords.
And users are unlimited each of them has its own permissions that are predetermined, and the permissions are defined for the smallest details and for each word individually by placing a (correct) signal in front of the allowed option and at the desired word.
We note in the account card and the material card with the new versions of the existence of the levels of validity.
And this means that we can protect a specific account or material and not allow it to appear or be detected by the rest of the levels, depending on the level we put to the passwords.
Note: If passwords are lost from the user, you must review the nearest agent of the program and by the license holder in person.
9-Currencies input:
After the globalization of trade, it has become more and more widely dealing in foreign currencies.
And in Al-Edari program we can deal with (99) currency in addition to the original currency.
– Currency name: we can type the name of the currency in its actual name or another name we choose.
– Currency symbol: we can put the recognized symbol for this currency like ($).
– Parts name: Which parts of the main unit of the currency, for example, the parts dollar (cent).- Decimal digits: it means how many digits after the comma and this illustrates the conversion accuracy and equation for base currency.
– The opening equivalent rate: it means the price of this currency against the first currency at the opening entry procedure.
And it is used by the program as a basis from which to offset the opening balances on the basis of that price.
Division: A new option is allowed with the new versions.
In the case of the first base currency is greater than the second currency, and here the equivalent price must be the parts and commas. So, Al-Edari company has found this option to facilitate the work and accuracy.
So that the accountant can write the price correct numbers, and activate the option of division to enable the program to calculate the exchange rate internally by division.

10-Currenecies movement:
It shows us the movement of the currency or its history since whenever we make a movement in a currency other than the SYP, we will be asked (Would you like to add this price to the currency transaction file?).
And here This transaction is placed in this file to show the exchange price movement optimally, the program depends on the price of the currency based on the time period.
If this currency is dealt with before registering a new price, the program depends on the price that it finds registered in the period of the creation of this process.
And we can choose one currency or all currencies.
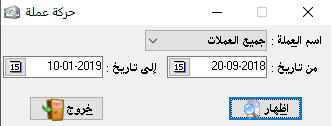
11- Balance confirmation:
An error may occur between the company and one of its clients, and this error may be in its favor or in favor of the client.
So, both parties want to fix this error and here the match between two balances must be made (the first- and second-party balances).
And this match indicates if the parties want to review their accounts, so the review will start from the date of their match and this saves the cost to review before the match.
And to prove the conformity with an account we use a balance confirmation section.
Where after the match is made if we request an account statement for this customer will appear to us since the date of the confirmation and keep the possibility of showing it fully before the confirmation if we wish.
– Account Number: customer number- Account name: customer name.
– Current balance: It automatically appears with a debit or credit type.
– Confirmation date: the date on which a similar balance was reached by both sides- The confirmation balance: the amount agreed upon by both parties upon conformity.
– Deduction account: A certain deduction may be required and here is enough to write the appropriate deduction account number to make the necessary entry for the deduction and then press “Match”

12- Files backup:
In order to preserve data from damage if the hard drive is damaged, copies of the data must be made and it is sufficient to locate the copy and write the appropriate note if any, and then press ENTER or OK.
And we can also choose an internal hard drive or from the network between the devices. So, we copied the files to the hard drive anywhere or on a removable hard disk where it is copied on it and then it kept away from the jamming factors. And here we have to specify the path that we will copy on it, for example, we can type the path e:edari.zip and the code (. ZIP) is necessary to make a compressed version.

13- Files recovery:
As Al-Edari files that have been copied can only be read on Al-Edari program.
And after knowing the necessary passwords, we can use file recovery to read them.
Where we locate the file or removable hard drive and determine from where we will recover the files.
And we need to be very attentive to the alert messages that appear.
Read the contents of the copy: means whether we want to read the data on the external storage drive.
Or we want to copy the data from the external drive on the current data in the computer (you should pay attention well before executing the order).
– Check the validity of the copy: The external storage drive may be affected by physical or mechanical damage.
Here it is being ascertained before trying to read.
Of course, the recovery cannot be done unless the same route is mentioned.
This means that when you copy on the path E:edari.zip we will not be able to recover the copy unless we select the same file name.

14- Rotate files:
At the end of the financial cycle of the company, it is necessary to rotate the files, which means transferring the balances of the accounts and materials to the next financial cycle. And no matter how long this cycle is, and without transferring the transactions that took place during the previous cycle.
And this process is very essential to maintain the independence and accounting of financial cycles.
We should not do the rotation until we are sure that all of our accounts are correct and we have made the entries of the provisions and the depreciation and we are ready to do the rotation. Because the return after rotation requires some operations that cannot be done only by contacting the distributor.
And by the license holder personally and that to maintain the security of the data.The rotation process is very simple and is explained in the rotation window as follows:
– The account of ready for sale goods at the beginning period non-inventory: We’ve already talked about the non-inventory material which does not show its value in the warehouse inventory, so we have to put the account name for these goods here and then we have to put the value of these goods in the designated place.
– The value of ready for sale goods non-inventory: Here we put the value of the finished goods, which originally do not appear from the value of the inventory in the trading account. So, we put it here to calculate it within the existing goods and thus enter into the calculation of the final profit.
– The account of raw materials at the beginning period non-inventory: the same treatment as the finished goods with different natures.
– The value of raw materials non-inventory: Here we also place the value of the remaining raw materials non-inventory at the end of the period.
– Round profits and losses: there must be an account that is designed to be a long-term liability or part of owners’ equity. So that it is arranged under the capital because the rounded profits are treated as long-term liabilities if they are not distributed and are among the rights of the owners. Here we put the number of the special account in which the value of the rounded profits or losses will be recorded.
– New file directory: It means the new place where our data for the new period will be placed. And here the program automatically takes the current file path and adds a word (/NEW) that indicates that these files are rounded up for files in the referenced path.
– Rotate non-closed accruals: Here we can transfer the outstanding accruals to the current period to follow up on their payment.
And the accruals paid will not appear.
– Rotate non-closed orders: Orders that have not been delivered yet to customers as they are transferred to the new period to follow up on their delivery.
– Delete closed accounts: it means to delete the account cards with zero balance to not move it to the new period.
And this When we have stopped dealing with them or the business relationship has expired.- Delete closed material: The cancellation of the materials cards with zero balances. And that’s about all the cards.
– When you choose to delete accounts, materials, or both, the sections in the left-hand side will be prepared.
And here by querying F2 we can identify the cards that we want to delete from the closed cards, either selectively or by selecting the cards that have been closed by a certain date. Because may not all closed cards are desirable to be deleted.
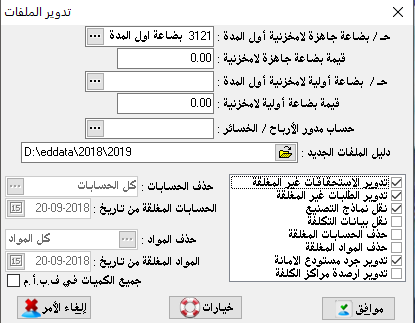
15- Import/export:
Due to the need to exchange information and accounting data between the parent company and its subsidiaries, the data transfer feature was developed by an external storage.
In the recent period in the internal market, we note that many companies with many branches that need to exchange information among themselves. So, the import and export advantage was developed in Al-Edari program and was the first program to achieve such an advantage in the Arab market.
Where this feature allows transferring invoices, accounting entries, materials cards, or all data combined.
When the parent company produces a group of new items or models it distributes them to its branches. And to shorten the time on the branches in defining the names of new product cards and specifications and to provide the writing of purchase invoices from the parent company.
The parent company sends the sales invoices to the branches with the goods sent via external storage or email.
1- Export invoices:It means transferring a portion of the data.
and is represented by invoices and all types of invoices. Where we can export only one invoice or several invoices and here, we have made copies of an invoice or group of invoices according to the following details:
– Filename: it indicates where the exported invoices will be copied to the hard disk or any storage drive directly writable, and the file suffix must be (. EDR) so that the program understands that they are invoices.
– Invoices type: We can export any type of invoices.
– Export: Here we can export a single invoice or group of invoices of the specified type.
– Invoice number: When we export a single invoice, the program will ask to place its number. And when we export multiple invoices the program will show us the options for picking these invoices on a number basis or on a date basis or selectively where we press F2 to inquire and choose the invoices that we want to export.
2- Import invoices:After the branch receives the data of invoices or entries it must enter and merge it into its current data (import).
-Create an invoice: means to write the imported invoices within our data, or just to open cards for the items in these invoices.
Or to modify the cards as per the cards received from the amendment. When we import an invoice, cards are opened for the items contained in them if there are no previous cards in our actual data. This is compared with the card number.
– Prices adjustment: The parent company may modify the prices of the items within its cards and of course, the adjustment of cards in the branches required a great effort.
Where we must access each card separately.
When we import invoices, the prices listed on the received cards are compared with the prices listed on our existing cards and if there are changes, they are adjusted directly to our cards when we choose it.
– The merge form: When a collection of invoices from the parent company is received, we can register them all in one invoice when we select (merge invoices into one invoice). Or we can leave those invoices separately as received when selecting (each invoice separately).
– Invoice date:
1- Specific date: All invoices received are recorded on the date we specify in the date field in front of the invoice date.
2- Original date: it is recorded in our data on the same date as the parent company.- The second party: Of course, when we import an invoice, the second party must be clarified. Where it is carried on his account, so we determine the account on which the invoices will be recorded.
– Trade account: An account that is usually at the bottom of the invoice. If we import invoices as purchase invoices, we write the purchases account. Thus, it is depending on the invoice imported.
– Invoice type:
1- Original type: The same nature of the invoice received if it is a sales invoice, we record sales. Where we can import a purchase invoice as a sales invoice or any type of place of any kind.
2- Purchases:
Whatever type of received invoice, it is recorded as a purchase invoice.
3- Purchases return:
Whatever type of received invoice, it is recorded as purchases return invoice.
4- Sales:
Whatever type of received invoice, it is recorded as a sales invoice.
5- Sales return:
Whatever type of received invoice,it is recorded as sales return invoice.
6- Input:
Whatever type of received invoice, it is recorded as an input invoice.
7- Output: Whatever type of received invoice, it is recorded as an output invoice.
– Warehouse: It is the warehouse where all the contents of the invoice will be placed.
– Location of files: Where are the invoices we want to import, and then press OK for once the import will be done very quickly.
3- Export orders:As the invoice export exactly, and orders are purchase orders and sale orders that registered. And the order is exported exactly as written.
And as the export of the invoice is done.
4- Import Orders:As the invoice import exactly.Merge form:
1- Each order separately: Therefore, each order is imported with its number and independently.
2- In one order: All orders are merged within one order and of course, it is carried out at the account of the second party we choose.
Order type: We have either a purchase order or a sales order where we can import the purchase order as sales and vice versa.
Date of the order: either we can set a specific date or we can leave the date as stated in the original order.
Warehouse: We can place the name of the warehouse where we want to move the goods in or out.
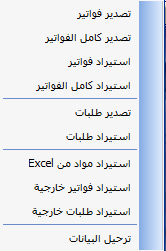
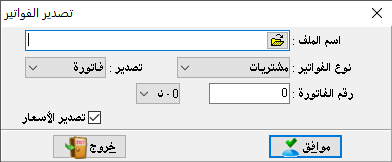
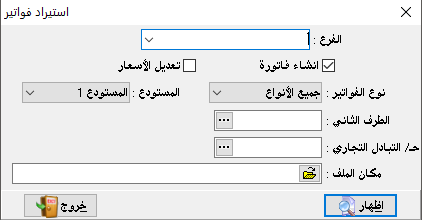
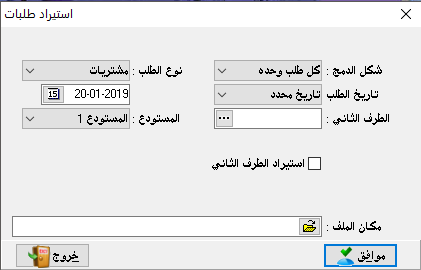
16- Migrating files:
We can transfer the data we want and combine it with our data according to the following options: * The index of the copy:
means the location of the data to be withdrawn such as e:edari1* Cancel posted files: It is meant to delete data that has been withdrawn from the place which it was taken.Invoices:
– All invoices: all types of invoices.
– Purchases: Only purchase invoices.
– Purchases return: only purchases return invoices.
– Input: only input invoices.
– Sales: Only sales invoices.
– Output: only output invoices.
– Output: Only output invoices.
– Transfer list: Transfer invoices.
– Account Invoices: Here we can choose the account we want to withdraw its invoices or a group of accounts.
Independently of the invoices of the remaining accounts.
– Merge options:
1- by date: i.e. by a specific date for these invoices.2- by number: i.e. by a specific number for these invoices.
3 by entry number: For invoices entry numbers only.
– From date – To date: When we choose to merge by date.
– From number to number: When you choose to merge by invoice number or entry number. Then press OK for once and the migration will be very fast.
In current market conditions and the recession crisis that is almost universal again. Dealing with the accruals has taken a big place and taking a clear position in business dealings. Each merchant must guarantee his rights by cheques or by promissory notes on debtors, and this is evidenced by producing accrual entries.
1- Accruals inserting:
In order to prove this accrual, whether it is due to us or owed on us, we go to accruals inserting section and begin to insert an accrual:
– Date: We place the date of registration of this accrual, not the due date.
– Currency: We put the agreed currency.
– The equivalent price: We put the agreed price.
– Type: We have four types, two of which are due to us, and two of which are owed on us:Notes and cheques receivableNotes and cheques payableWhatever type of accrual the chart of accounts must contain a specific account related to it, which is the name of the customer for which the accrual was written.
The accrual may be a single bond with one due payment or more than one payment. And there may be a set of accruals written at one time
.a- Inserting on accrual:
– Number: The accrual number to be inserted and it is automatically generated.
– Amount: Which is the total value of the accrual.
– The number of installments: If the accrual is due to be paid in installments, we write how many payments will be made.
– Due date: The date on which this accrual should be paid.
– Document: The number of the paper document proving this accrual.
– Sponsor: We may place a person or bank that will guarantee this customer, to ensure the payment of the accruals if the receivable is not paid.
So we put his name here where the amount is transferred to his account when not paying.
– Description: Here we write an explanation to explain why this accrual was created.
– The claimant’s account: It is a confirmation of the account at the top, which was drawn on. Or a third party to pay.
– Bond consolidation: It is used to merge all written bonds to one client into one bond.
– Create an entry: Here we have the option of reducing the client’s debts by the amount of the written bond, which is the best option because we’ve got a written bond with value against his debt.
Or we do not reduce his balance by not creating an entry where we reduce his account on the payment day.
If we chose the option to create an entry, a window will appear for us to write the account number that will control the movement of these bonds by type.
So, if these accruals are notes receivables will show us the notes receivables.
And we must put the account number of the notes receivables we have created in the chart of accounts within current assets.
b- When inserting multiple accruals: We can note the same head of the template but shows us a table that allows us to write more than one accrual at a moment and with different dates and to more than a client.
The remainder is treated as a single accrual inserting.
2- Showing accruals:
After we have registered all kinds of accruals, we can see them by showing accruals.
– The type: Where we choose the accrual to be shown or choose to show all accruals.
a- Notes receivables: It’s drawn on customers.
b- Notes payable: It’s issued by suppliers and drawn on us.c- Cheques receivables: It’s drawn on customers.d- Cheques payables: It’s issued by suppliers and drawn on us.
– The show options:
– The account: Name of the person who we registered the accruals on his account.
– The claimant’s account: This is the account of the sponsor if the original account of the accruals did not pay.
In short, it is the sponsor account if it is no the bank.
– Bank/sponsor: It is a guarantor of the original account if it has been sponsored by a bank so that when it fails to pay, the bank will pay.
– Paid amount: the claimant may pay a part of the due notes. And this option shows the paid amount if part of the due amount is paid.
– Document: Paper document number that proves the accrual.
– Description 1: It is the written explanation to illustrate what is this accrual.
– Description 2: For additional explanation.
– Closed accruals: It means to show the accruals that have been paid in full amount.- Currency: It means to show the currency in which the accrual was written.
– The equivalent price: It is the equivalent price of the currency.
– Address: The address of the client.
– The currency of the show: We can show these accruals in any currency we want.
– The account: We can select an account or group of accounts to show only the drawn accruals.
– The claimant’s account: We can select an account or group of accounts to show only the drawn accruals.
– Bank/sponsor: It is a guarantor of the original account if it has been sponsored by a bank so that when it fails to pay, the bank will pay.
– Document: We can select a document number related to a particular accrual (as a searching method to find a specific accrual).
– Description: It is the description that was written when we inserted the accrual. And it make it easier to find a particular accrual.
– Date of the accrual: Here we can specify two dates to find accruals registered between these two dates.
– The amount: Also, we can specify two limits of amounts to find accruals with a value falls between these two limits.
– The show button: To show accruals based on what options we selected.
3- Posting accruals:
The section of showing accruals is mainly for the purpose of knowing a particular accrual number in order to be posted when it is due.
When we know the accrual number to be posted, we go to the accruals posting section, and we can note that the upper section cannot be written, but the special accrual data is shown when the number is stated in the bottom.
– The type: Where we can define the type of accrual we’re going to post.
– Number: The accrual number which we want to post. And when we mention this number its data will show at the upper section.
– Date: It is the date of the required accrual.
– Currency: It is the currency in which the accrual was written.
– The equivalent price: for the previous currency.
– The paid amount:
As we mentioned before, the client may pay part of the accrual value.
Therefore we can write that value in this field. Also, if the full value was paid we can write it here.
– Create an entry: When selected, it will appear below two accounts to write the entry of this payment, where the debit party is the account that received the amount such as the cash, bank or any person’s account if the amount was transferred to its account, and in the creditor party the name of notes receivables account. And of course, writing entry varies depending on the type of the accrual.
– Closing the accrual: If the paid amount covered the full value of the accrual, we can close the accrual to not be shown again unless we request to show closed accruals.
– The posting button: It means to transfer this accrual to payment and writing the payment entry, or not write it based on the options we selected before.
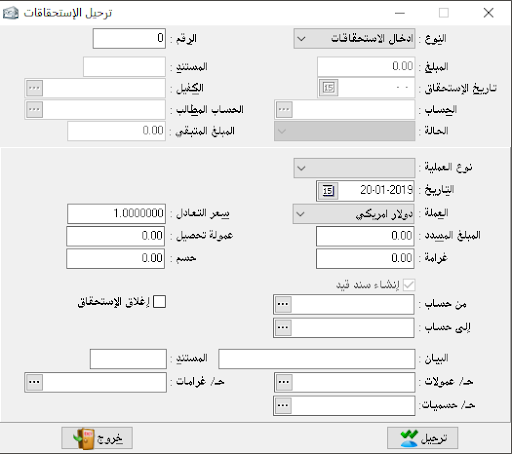
4- Unpaid accruals:
It is a window to show the unpaid accruals.
And we can review unpaid accruals related to a specific account and for a specific period, and we can request the report in the monthly show.
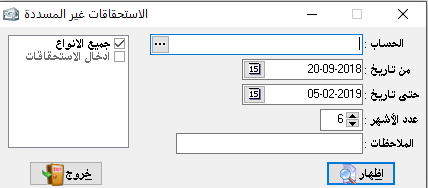
5- The payments of the accruals:
A special window to inquire about accruals paid within a given period, the accruals payable to a given account can be reviewed, the date of the paid accruals can be selected, and how the payment is made, whether by receipt or by closing the accrual and creating an accounting entry or without.
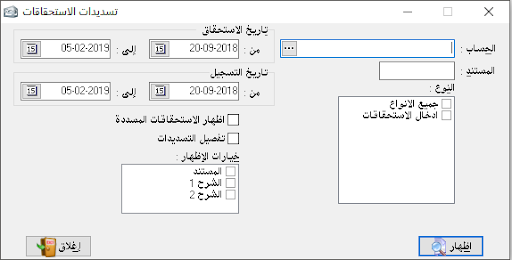
6- The constants of the accruals:
As a result of the expansion of the market and keeping pace with the latest work mechanisms, we have developed a new feature in the latest software releases, which is to automatically link the invoice with accrual and pay it on more than one payment.
And we can select more than one accrual pattern for the company’s billing types, or if there are several branches through billing books where each book or branch is linked to its own accruals and is separated from the accruals of other branches.
Each accrual pattern can be linked to special accounts.
In addition to the traditional method of accruals which is the inserting of the accruals manually and the not link it to invoices.

Arrived arrest:The currency:
It means the currency in which the cash was received.
It can be done by any currency. The equivalent price: the exchange rate of the second currency if the cash was received by the second currency.
Cash/Bank: the cash account in which the cash was received.Document number: it is an automatic number generated by the program (receipt number).
Date: the date of receiving the amount or creating the receipt.
The account: the name of the account which paid the amount. And it is pre-identified in the chart of accounts.
The amount: it is the net amount received from the creditor account.The commission of the collection: it is the paid amount as a result of the collection if any.
Discount: it is a new addition to the NX version to put a lump sum discount on the balance when we create a receipt.
Commissions account: it is a place to put the commission account to complete the collection commission entry.
Discount account: it is a place to put the discount account to complete the discount entry.
Description: it is an explanation of the receipt and we can add notes about the receipt.The currency: It means the currency in which the cash was paid.
It can be done by any currency.
The equivalent price: the exchange rate of the second currency if the cash was paid by the second currency.
Cash/Bank: the cash account from which the cash was paid.
Document number: it is an automatic number generated by the program (payment voucher number).
Date: the date of the payment or creating the receipt.
The account: the name of the account which received the amount.
And it is pre-identified in the chart of accounts. The amount: it is the amount paid.
Description: it is an explanation of the payment voucher and we can add notes about the payment voucher.

It is the entry that the debtor or creditor can have a set of accounts (more than one account for each party). For example, if we want to prove payment and expense on a particular invoice we cannot prove it by a simple entry but there must be a complex journal entry because there is more than one party and of course this entry is automatically created.
– Currency: it is must be chosen to create an entry by that currency.
– Equivalent rate: it’s the rate of chosen currency against Syrian pound.
– Notes: We may mention the document number related to the complex journal entry.
– Date: the date of the entry.
– Debit: where we type the amount related to debit party and in front of each debit account.
– Credit: where we type the amount related to credit party and in front of each credit account.
– The account: where we type the account name whether it is debtor or creditor, while which determine its nature is the opposite amount if it was typed in the debit cell so the account must be debit, and if it was typed in the credit cell the account must be credit- Description 1: it is to explain the purpose of the entry and the transaction.
– Description 2: Additional explanation about the transaction.
– Currency: We can choose a currency for each line and we can create an entry with more than 99 currencies, and this option appears with additional options by double-clicking on the small rectangle above number (1) and beside the word Debit.
– Equivalent rate: it’s the rate of chosen currency against Syrian pound.
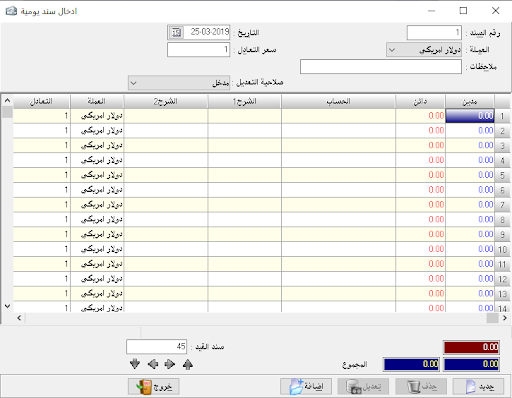
We can receive more than one amount within the same complex receipt entryCash account: it is the cash account that will receive the amounts from the accounts in the table at the body of the template..The amount: the received amount.
The account: the name of the account from which we received the amount.Description 1: it is to explain the purpose of the entry and the transaction.
Description 2: Additional explanation about the transaction.Currency: We can choose a currency for each line and we can create an entry with more than 99 currencies, and this option appears with additional options by double-clicking on the small rectangle above number (1) and beside the word Debit.Equivalent rate: it’s the rate of chosen currency against Syrian pound.
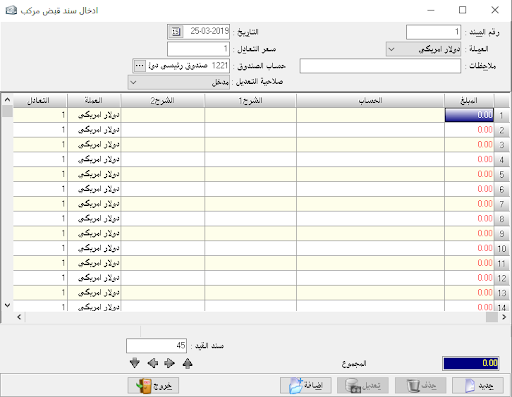
We can pay more than one amount within the same complex payment entryCash account: it is the cash account that will pay the amounts to the accounts in the table at the body of the template..The amount: the paid amount.
The account: the name of the account which received the amount from the company.
Description 1: it is to explain the purpose of the entry and the transaction.
Description 2: Additional explanation about the transaction.
Currency: We can choose a currency for each line and we can create an entry with more than 99 currencies, and this option appears with additional options by double-clicking on the small rectangle above number (1) and beside the word Debit.Equivalent rate: it’s the rate of chosen currency against Syrian pound.
It is a special window to show the vouchers whether it is payment or receipt or both of them. And we can filter the findings by document number, document date, or due date.
The account:
to find the vouchers of a particular account.The document: to find the vouchers by the document which contain a specific text or number.
The Description: to find the vouchers by the description which contain a specific text or number.Currency: to show vouchers by a particular currency.
Show the bank: to show the bank account which included in the vouchers within the report.
Show the document: to show a column within the report contains the documents included in the vouchers.Show currency: to show a column within the report contains the currency included in the vouchers.
Show equivalent price: to show a column within the report contains the equivalent price included in the vouchers.Show description: to show a column within the report contains the description 1 included in the vouchers.Show the cash: to show a column within the report contains the cash account included in the vouchers.
The number: in the case of specifying the sorting by the number we can specify a particular range to show entry numbers.
The date: in the case of specifying the sorting by the due date we can specify a particular range to show due dates.
The amount: we can show the vouchers within a specific range of amounts

It is a special window to review the journal entries of receipt, payment, or both of them. And we can filter the findings by document number, document date, or within a specific period.
The cash account: we can show the journal entries of a particular cash account if there are journal entries contain more than one cash account.
The show currency: we can show the report by a specific currency.Entry number: to show the entry number that generated from the journal entry.
The document: to show the document which included in the journal entry.
The description 1: to show the description 1 which included in the journal entry.
The description 2: to show the description 2 which included in the journal entry.Show currency: to show a column within the report contains the currency included in the vouchers.Show equivalent price: to show a column within the report contains the equivalent price included in the vouchers.

It is a special window to review the journal entries of receipt, payment, or both of them. And we can filter the findings by document number, document date, or within a specific period.The cash account:
we can show the journal entries of a particular cash account if there are journal entries contain more than one cash account.The show currency: we can show the report by a specific currency.
Entry number: to show the entry number that generated from the journal entry.The document: to show the document which included in the journal entry.
The description 1: to show the description 1 which included in the journal entry.
The description 2: to show the description 2 which included in the journal entry.Show currency: to show a column within the report contains the currency included in the vouchers.Show equivalent price: to show a column within the report contains the equivalent price included in the vouchers.
It is a special window to review the journal entries of receipt, payment, or both of them. And we can filter the findings by document number, document date, or within a specific period.The cash account:
we can show the journal entries of a particular cash account if there are journal entries contain more than one cash account.The show currency: we can show the report by a specific currency.Entry number: to show the entry number that generated from the journal entry.
The document: to show the document which included in the journal entry.
The description 1: to show the description 1 which included in the journal entry.
The description 2: to show the description 2 which included in the journal entry.
Show currency: to show a column within the report contains the currency included in the vouchers.
Show equivalent price: to show a column within the report contains the equivalent price included in the vouchers.
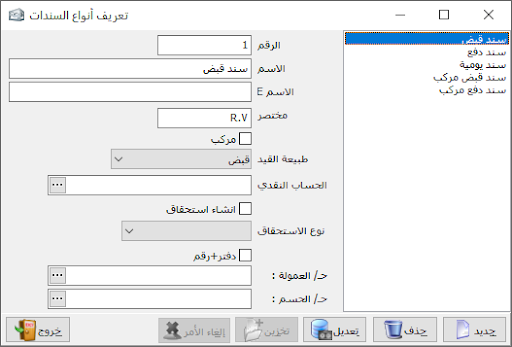
There are many companies dealing in the way of orders. It doesn’t store the goods so that it manufactures or purchases the goods requested only.
This is to avoid recession or because its goods are of a special nature or for other special considerations, and therefore the goods required to be supplied or manufactured must be recognized, as well as the goods to be ordered from others.
1- Inserting the orders:
Let’s say we run a clothing workshop, and the customer ordered certain quantities of models, so we have to record this with a sales order as follows:
– The order type:
Sales order: it is related to goods we will provide others with it.
Purchase order: it is related to goods we will request it from others.
– The second party: he is the person who requested the goods from us, or we requested the goods from him (depending on the order type).
Sales price: it is the same price mentioned in the invoice section. And it is the stock prices in the materials cards.
– The warehouse: to determine the warehouse where the goods will be stored or from where the goods will be out on the delivery date.
– The order number: Every type of orders has a special numbering.
– The name: it is the same name in the invoice. And it is for statistical purposes only.
– Discount ratio: it is the rate that will be subtracted from the material price which included in the material card. And will be recorded on the order and then on the invoice related to this order.
– Priority: it means the importance level of the order to execute the most important orders at the first and then the less important.
– The currency: it is the currency in which we will create the order.
– The equivalent price: it is the currency equivalent price if the used currency other than the SYP.
– Registration date: the date when the order received and recorded.
– Delivery: which method will be used to deliver the order. And it has no accounting linking and only for statistical purposes.
– Delivery date: it is the date of executing and delivery of the order as agreed.
– Payment method: it is the agreed method to pay the order value. And this method will be inserted in the invoice related to this order after posting it.
– Shipping company: the company that will ship the goods.
– The salesman: the person who submitted this order.
– Reserve order quantities: It is very important so that there is no conflict in the delivery or registration of orders. When we reserve the quantities of the order the warehouse inventory will show only the quantities available for sale after deducting the quantities recorded in the orders, which is useful to know what can we sell completely.
The lower section of the order we can show the rest of its options by double-clicking on the rectangle that is above the number (1) as in the invoice.
– Material number: it is the number of the requested material.
– Material name: it is the name of the requested material.
– Warehouse: it is the warehouse from which the material will be moved by the order type.
– Length – width – quantity: it is specific to the businesses that sell goods counted on the basis of area. Such as carpenters and sellers of glass where the area of the material is determined (45.5*30*1) and equal to 1.385 square meters of glass. Then it is multiplied by the price of the square meter and so we will have the price of the goods sold.
– Quantity 1: it is the requested quantity in the order.
– Unit: here we can deal with any unit specified in the material card.
– Quantity 2: It is equated with the first unit according to the equivalent specified in the card.
– Quantity 3: It is equated with the first unit according to the equivalent specified in the card.
– Discount ratio: it is the discount will be deducted from the original price specified in the material card.
– Individual price: it is specified based on the first unit.
– Total price: it is the result of multiplying the quantity by the individual price.
– Reserve the quantity. We can reserve some quantities within a particular order if we don’t want to reserve the quantities of the whole order.
– The salesman: we can specify the salesman of each material within the order.
– Notes: any notes related to this order.
If we want to modify any item within the order we can do it as in the invoice or accruals. So we should go to the orders inserting section and find the required order by its number and then we can modify the order and then we should press on the modify button. And if we want to delete the order we should press on the delete button.
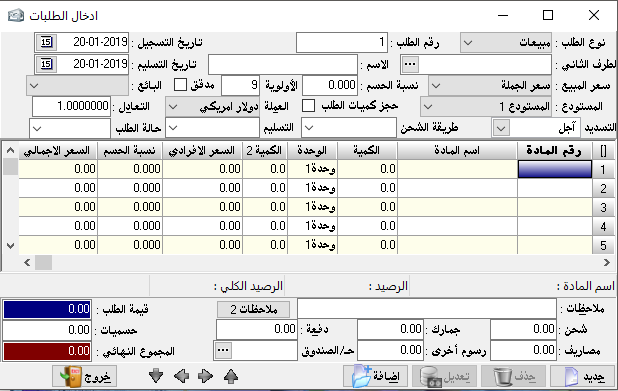
2- Posting orders:
When the delivery date is due, the delivery must be verified, after the order number is identified from the show orders section, then we go to the orders posting section and by this process, the order will be transferred to an invoice according to the type of this order.
– The order type: sales order or purchases order.
– The order number: it is the order we want to post.
– The second party: it appears automatically after typing the order number.
– The name: it is the same name within the invoice.
– Sales price: it is specified depending on the price pre-specified in the order and after typing its number.
– Discount ratio: it is specified depending on the order.
– Invoice notes: it is the notes that will be mentioned within the invoice, and depending on the order.
– The salesman: it is specified depending on the order.
– The registration date: it is specified depending on the order.
– The date: it is the date of delivery.
– The currency: it is specified depending on the order.
– The equivalent price: it is specified depending on the order.
– Material number: the materials numbers included in this order will show after typing the order number.
– The ordered quantity: will be inserted automatically after typing the order number and it is depending on the order.
– The delivered quantity: it is the quantity that we deliver or we receive and it may be equals to the ordered quantity or may not.
– Individual price: it is specified depending on the price pre-specified in the order and if not pre-specified we can specify it here.
– Total price: it is the result of multiplying the individual price by the delivered quantity.
– Invoice number: it automatically appears.
The accounts exist here are the same accounts which will be included in the invoice after posting the order.
– Payment: if there was a payment at the delivery moment.
– Add invoice button: it means to post this order and then it will be transferred to invoice. And of course, we don’t need to insert the invoice manually.
– The section of closing the order at the top: it means to close it if all quantities delivered.
3- Show an order:
The basic purpose of it is to check the registered orders by reviewing and printing if needed. And we can know the number of the required order from the show order section and we can note that all the options are clear and explained before many times
4- Show the orders:
Its purpose to show the orders numbers that related to each customer to post it when it ready.
– Account number: we can input here the client’s name who we want to review his orders.
– The order type: sales order or purchases order.
– The show method:
1- By the registration date: All orders appear in chronological order and according to the date of registering each.
2- By the delivery date: All orders appear in chronological order and according to the date of delivering each.
3- By the number: Appear in their numbering sequence.
4- By the account balance: the orders of clients will appear depending on the account balance of each client and will be sorted from the lowest to the highest balance.
The type of the statement:
a- Overall statement: the order will appear without details of its items and prices.
b- Detailed statement: the order will appear with details of its items and prices.
– The currency: we can choose the currency that we want to show orders registered by it.
– Show orders:
1- By date: and here will appear fields related to dates so we can select dates we that we want to show its orders.
2- By number: the orders will appear by its numbers sequence.
– Show the name: it is the same name within the invoice.
– Show the orders in other currencies: it means to show the remain orders that registered in another currency.
– Show closed orders: the orders which delivered.
After the show, if we clicked on any order by the right button we will see the posting option immediately.
5- The show of material orders:
And here we can search for orders related to a particular material or group of materials and for all clients or for a particular client. Therefore, we can know the orders refer to a particular client and a particular material.
– Account number: the name of the client that we want to know his order of a particular material.
– Order type: sales orders, purchases orders, or both of them.
– The show method: they are the same methods in the showing of the orders section.
– The show unit: we can choose the required unit and it is pre-identified in the material card.
– Currency: we can choose any currency.
– Material number: we can input here the name and number of the material that we want to find its orders.
The type of the statement:
a- Overall statement: we can note here the disappear of some options and will appear the material name, number, quantity, and the client.
b- Detailed statement: we can show the order with all the details and we can use all sections that we explained before.
Note: We have briefly explained the orders section because most of them have been explained in the invoices section, which is very similar to them.

6- Inserting offers:
The offer is made at the request of the customer who wants to compare between market prices to choose the most appropriate. The offer is like the invoice, but it is not linked to warehouses or accounts, but only in writing and this helps us a lot.
Instead of writing this offer on the Excel program we write it directly and using the names of materials and pre-packaged prices in advance.
The contents of the offer are identical to the invoice and the offer is written in the same way as the invoice is written. Therefore, it is not necessary to re-explain this. The validity of the offer shall be noted as it explains the period of the offer and the conditions included.
And of course, after writing the offer we can print it and save it. And we should write on it the same offer number in the program.
7- Show prices offers:
Its main purpose is to see and view the offers for discussion when needed.
– Offer number: we can type the offer number that we want to show.
The remaining show options have been explained before.
inserting a production model (its shortcut is Shift+Ctrl+F5):
The purpose of this model is to indicate the raw materials and industrial expenses incurred during the production of a particular good and with the exact quantities required for it.
– Model number: it is sequentially.
– The name: the name of the manufactured item.
– Raw materials warehouse: it is the name and number of the warehouse where raw materials exist.
– Finished goods warehouse: it is the name and number of the warehouse where finished goods exist.We can note that the list is divided into 3 sections, the first section indicates the raw materials involved in the production and it expands to a very large number of raw materials, and it is:
– Material number: it is the card number of the used raw material.
– Warehouse: warehouse number where the material exists.
– Material name: it was explained earlier.- Quantity: it is the quantity used in production from this material, usually we input the quantity of raw materials required to produce one unit from the finished goods.
– Individual price: the price of one unit of raw materials, and this is not possible to write in because it is automatically taken from the cost of the material in the warehouse.
– Type: it means that if this material is essential in manufacturing so that if we do not have enough stock we can not complete the manufacturing process. If the material is secondary, it means that we can make the finished product but we may not sell it directly. (example, the packaging bag is considered a material in production which is secondary where it can be manufactured without it but cannot be sold without packing).
*- The second section: it mentions the types of direct and indirect industrial expenses involved in the production process, it can expand to 250 types of expenses.
– The amount: the amount spent from this type of expense to manufacture one unit of the finished product.
– Expense name: the expenses names for which we do not want to place an account in the chart of accounts, i.e. without accounting control.
These names are defined from manufacturing format section in the program constants.
– The account name: we may have predetermined production expenses accounts and they are under the operation account.
And if we input the name of this account here we will know the actual expenses from this account on the production process.
And this is important to study costs variances.
– External account: It means that this expense relates to a particular supplier.
Like if we had an operation at an outside workshop.
Thus, this expense will be calculated from the cost of producing the item and also charged to the supplier for subsequent repayment.
The special accounting entry is will be written automatically with sufficient explanation for the operation.
– To account: Here we place the name of the supplier account that has done the service. Then the accounting entry that we mentioned earlier will be written:The account Debit CreditExpense ( ) XSupplier ( ) XPorducing …….. of …………- Direct expense: If a reference is made in this field, it means that the expense spent is a direct expense on production and will be included in the composition of the product directly.
If such a reference is not made, it means that the expense is an indirect expense. Such as (oil, fuel…).
* Section 3: represents the types of goods produced and by the amount of one unit.
It accommodates a large number of goods that can be produced from the use of raw materials and charges recorded at the top.
– Material number: it is the card number of the finished product.
– Warehouse: we should mention here the name or number of the warehouse where the products will be placed in it after production.
– Material name: it is the name of the finished product.
– Quantity: We put the amount that can be made from the above quantities of raw materials and expenses.
– Percentage: The percentage of completion of this product when manufacturing it.
It is useful when manufacturing a semi-finished material and including it into the composition of a finished product where its completion rate is not equal to 100%.Below is a set of accounts that will adjust the movement of raw materials and finished goods to and from the production line.
– Output account: It is the account that used to prove the raw material output from warehouses to the production line.
– Input account: It is the account that used to prove the finished goods input from the internal workshop or the production line to warehouses.
– The opposite account: it is the internal workshop or production line account which is pre-described in the chart of account and its origin to the operating account.
– Equal prices: It means dividing the prices of raw materials and expenses equally on finished goods in case there is more than one material. And that in the third section of the form.
If you want to modify or delete a model, we can request its number from the place of entry and then we can make the necessary adjustment and then press edit or delete.
The insertion of a list of contents is one of the most important sections of the manufacturing so it must be carefully studied and inserted in a very precise manner.
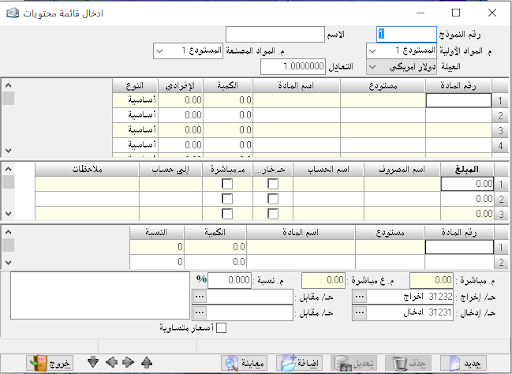
* Inserting a cost statement and its shortcut is Shift+Ctrl+F6:
The second stage in manufacturing is to study and determine the cost of manufacturing model.
– Statement number: It is preferable to place the statement number similar to the model number in relation to the model and the cost of a particular product.
– The name: The same name as in the previous manufacturing model.
– Date: The date this cost was set.
Model number: The same as the model number that was entered earlier and can be queried by pressing F2 and when we type the number of the model that we want to study and put its cost, we will find it automatically written before us.
All sections in it are the same as those described in a manufacturing model section. We then examine and confirm the validity of the costs or make the necessary adjustments and then press the add button.
If we want to modify or delete, we ask for a cost statement through its number where it can be queried by pressing F2.
And make the necessary adjustment and then press the Edit button.
Then we are ready to do the production process simply.
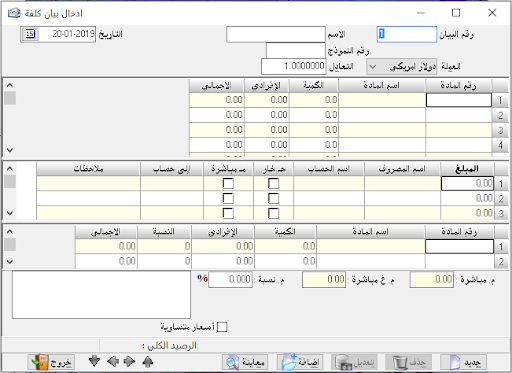
Making a manufacturing process its shortcut is Shift+Ctrl+F1:
It is the last stage in the manufacturing process after determining the product components and the cost of each compound.
– Operation number: It is sequential by the number of operations..
– Model number: We should put the model number that will be manufactured and can be queried by F2- The number of models: means the quantity to be manufactured where we mentioned previously that we identify in the list of contents the quantities needed to manufacture one unit of the product and represent a single model. And from it, if we want to manufacture 100 units we write the number of 100 models.
– Output date: The date of outputting raw materials from their warehouses.
– Input date: the date of inputting the finished goods into warehouses.After setting the model number we find the model ready before us. If we want to make some adjustments we can do so and then we press add:
– Invoices entries: it means to link input and output invoices with accounting entries to prove input and output operations.
– Make an input invoice: it means, would you like to write an invoice to prove the entry of the finished goods to the warehouse or not?
– Output invoice: it means the output invoice number that is written to prove this manufacturing process.
– Input invoice: it means the input invoice number that is written to prove this manufacturing process.
If we want to modify or delete, we find the selected manufacturing process and then we do what it takes.

Inserting a manufacturing order
As noted in the orders section, we register an order for delivery of certain goods and when they are due and ready to do so we will post this order.
Here we write a manufacturing order to take its role in the production process and then to be manufactured, of course depending on the order of a particular client.
– Order number: a serial number indicating the number of manufacturing orders recorded – Model number: Here we can query by F2 for a specific manufacturing model that has already been inserted and when we mention the model number we find that it has appeared in all its details.
If we wish to make any modification, we modify the order directly and without reference to the model.
This, of course, is useful in meeting special orders or modifications requested by the customer on a particular model.
– Number of models: means the quantity to be manufactured.
– Registration date: the date on which the customer ordered the manufacturing order- Delivery date: Agreed date for delivery of the order contents.
– The rest of the details are the same as those described in the inserting of contents section.
– Output order: The output order number that is registered for this manufacturing order.
– Input order: The input order number that is registered for this manufacturing order.
The input order is optionally registered when we place a flag at the section of input order. If we wish to return to the order and modify or delete it, we ask for it by number and then we do the necessary.
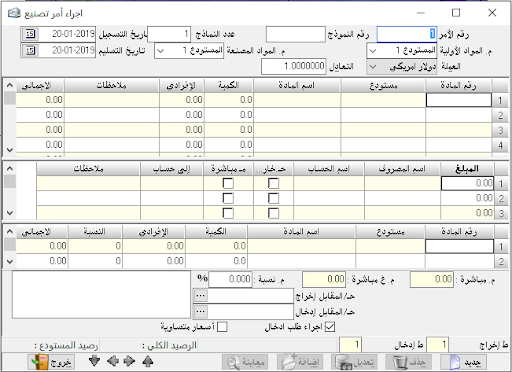
Posting the manufacturing order:As the posting of the order. When the delivery time comes, we post this order and a manufacturing process is performed as previously entered.
This automatically posts the input and output orders and converts them to the input and output invoices that are associated with the manufacturing process that was performed.
– Order number: The previously entered manufacturing order number. As soon as it is typed, it shows us exactly as it was entered.
As will be manufactured according to it. Therefore, if we want to make a manufacturing process for this order, we press the Add button.
* Manufacturing InvoiceWhen we perform a manufacturing process for a particular model, we prove this by making a manufacturing process and thus covering a single manufacturing process.
If we want to do more than one manufacturing process at a time and save time and work on manufacturing processes, we go to the manufacturing invoice where we can carry out a large number of manufacturing operations simultaneously.
– Manufacturing invoice number: A serial number that adjusts the number of manufacturing invoices made – Date: the date on which the manufacturing operations listed on the invoice were performed.
– Storage of manufacturing operations: this is intended to execute the transactions mentioned in the Invoice and write a transaction for each line of the invoice.- Make an input invoice: it the input invoices that are associated with the manufacturing process that has been made.
– Raw materials warehouse: it is the warehouse number where the raw materials will out.
– Finished goods warehouse: it is the warehouse number to where the finished goods will enter.
– Output date: Material output date.
– Input date: the date the goods were entered.
– Model number: It can be queried with F2 and represents the manufacturing model or list of previously entered content.
– Model name: Once we select the form number, the name is automatically mentioned with it.
– The number of models: the quantity to be manufactured from each model.
– Raw materials warehouse: If a warehouse is selected here, the work of the top warehouse section is neglected and the program takes the warehouse section here.
– Finished goods warehouse: Same as previous paragraph.
– Output date: Here when we define a date, the work of the date paragraph at the top is neglected.
– Input date: Here when we define a date, the work of the date paragraph at the top is neglected.
– Process storage: Where we can choose whether or not to write a manufacturing process for this model.- Input invoice: This also gives us the option to make input invoices for manufactured goods to enter warehouses or not.
* The lower section of the invoice shows us the finished goods that are manufactured based on the identification of the manufacturing model numbers mentioned in the upper section.
If we want to delete or store this invoice, we press the store or delete button.


* Materials needed for manufacturing
We may be asked or want to manufacture a certain quantity of a specific model.
In order to complete this process, it is necessary to have adequate quantities of raw materials.
To know that, we should go to the section of the materials needed for manufacturing.
– Model number: it is the model number desired to know the necessary quantities of raw materials to manufacture a certain amount of it.
– Model name: After mentioning the model number that can be queried with F2, the name of the model appears automatically.
– The number of models: the quantity desired to calculate the materials we need to manufacture.
– Show the missing quantity: it means if a material is not sufficient to manufacture the required quantity in the model.
– Show the remaining quantity: it means the excess quantities for manufacturing needs that have been quantified.
When you press the show button, we note a table showing the material number, its name, its current balance in warehouses, the quantity needed to manufacture the selected models at the top, and also the missing quantity from the limit for manufacturing, and as the excess quantity of manufacturing and, of course, as other reports it this report can be sent To EXCEL..* Quantities that can be manufacturedThis paragraph could be seen as an opposite of the previous paragraph, where we were looking for the quantities needed to complete the shortfall.
While here we are looking for possible manufacture of our materials in warehouses.
– Model number: Here we quire about the model that we will manufacture to know the quantity that can be manufactured and of course after taking into consideration the basic materials and secondary materials.
Because here we can produce a certain amount may decrease or increase with or without consideration of the secondary material. When we press the show button it will show us a table as follows:
– The number and name of the material and the type of this material whether it is basic or secondary.
And the current balance of the material and the number of models that can be manufactured taking into consideration the secondary material or without consideration. At the bottom we find the materials manufactured from the raw materials at the top and their respective quantities and in detail with secondary materials without.
Depending on that, we determine our ability to implement a manufacturing process through our raw materials inventory in the warehouses.

Cost and expense correction:
We have noted the importance of inserting a manufacturing model in that it defines the estimated costs and their use in manufacturing this model. However, expenses may happen to vary, whether direct or indirect. For a particular manufacturing process that may have special specifications or special nature, we will have to adjust the prices for this process by entering the manufacturing process, ordering the process number, making the necessary adjustment and then storing. Here, what we have estimated in the manufacturing model will differ from what has already been spent on this process, that is, we have a real cost deviation from the estimated cost. If we wish to correct this deviation so that we return the real expenses as estimated, we press the correction button. Of course, we can choose to calculate a specific type of expense to correct its deviation and we may choose more than one account or all accounts as well as a specific date. * The cost correction section is intended to mean that if, for example, we rely on the method of calculating the cost of the material on an average cost basis; we will change the method of calculating this cost. This can be done for one or more materials or all raw materials.
Also, we can choose a specific date to adopt the new cost method.
* Waste control ReportJust as we talked about correcting expenses may happen for raw materials.
The quantities actually disbursed may differ from the quantities estimated to be spent in the manufacturing model.
Here we choose the model to know the difference between the actual and estimated disbursements.
This is very helpful in knowing our appreciation whether it is in place or not for manufacturing models. And are the quantities that have been estimated actually disbursed on more or less.
Of course, the quantity actually disbursed is confirmed by entering into a manufacturing process and modifying it according to the report from the production line or workshop in the manufacturing process. Of course, it is very important to pay attention well before performing the correction process because it cannot be undone.Second: Serial number version: In recent years, imported goods have become more prevalent, especially electrical and electronic tools, telephones and cellular devices, as well as a wide range of locally manufactured goods. Of course, each commodity or each piece has a serial number to distinguish it from another piece for ease of reference when requesting maintenance, for example, or when the buyer or seller knows it, in order to achieve accurate control, non-manipulation, and fraud.
This version would control the movement of the serial number where we find in the program constants section additional options in which to adopt the serial number.
And after activating we find in the invoice a special column for that as well as in the section of materials.
* Serial Number Report: We find two main sections:
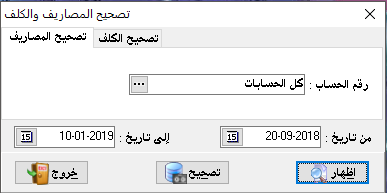
Extras:
Restart the last process:
the last window we opened in the program will restart.Notes file: such as notepad, where some important notes are placed, and we can save it and create an unlimited number of files.Calculator: it is the program’s calculator.
Reports: Any economic or commercial establishment must analyze its liquidity, and know its debt ratios towards others and the age of its debts. In this program we have developed a series of reports that are useful in sales and liquidity planning as follows:

a- The most dealing customers:
This will classify customers or clients in general according to the most important customer in light of the volume of dealing with us, and we can choose a customer or group of customers and link it to a single material or a group of materials, and it also benefits us in determining a new method of dealing with each client and planning the method of selling it in cash or in the accrual or both. And of course, this is due to the personal appreciation of the investor.
– Account number: Customer account number or name and here we can choose one customer or group of customers and we may choose a master or sub-account.
– Material number: The material we want to define to know the size of the customer’s chosen dealings with it, we may choose a vital material or medium material to estimate the size of the draw from this customer.
We can choose one or more materials.
– Statement type:Overall statement: Where it only shows the account number and name, the quantities of all the items that have been moved with this account, whether buying or selling and the value of these quantities without distinguishing the individual material.
Detailed statement: Appears differently, where the account name appears and then a table showing the name and number of each material, the quantity traded and the value of this quantity, i.e. it does not confuse all the material but shows each material separately.
– Movement type: When it classifies these customers on which basis depends.
a- Net sales (amounts): its rating is based on a descending starting from the largest amount of sales minus the sale returns.b- Net purchases (amounts): its rating is based on a descending starting from the largest amount of purchases minus the purchase returns.
c- Net sales (quantities): its rating is based on a descending starting from the largest quantity of sales minus the quantity of sale returns.
d- Net purchases (quantities): its rating is based on a descending starting from the largest quantity of purchases minus the quantity of purchase returns.

b- Collection and debt ratios:
In most of the establishments do not deal with cash in full, but it must sell or buy on credit, so it is very important to know the amount collected from the client and the proportion of this amount of total debt, in order to determine whether it is possible to raise his credit to us or not, A high repayment ratio does not prevent it from increasing its credit or increasing its sales of futures more accurately, and thus helps us to identify the client with a good debt from the client with a weak debt.
– Account number: we can choose one account or more.
– Statement type: it means on which basis this report will be prepared.
a- Collection ratios: it is related to customers or receivables in general.
Because it explains the debt amount that customers owe us and also the collected amount from it.
Therefore the collection ratio from this customer.
c- Payment ratios: it is related to suppliers or payables in general.
And it explains the amount we owe to the suppliers and the ratio of our payment of it.
So we can determine if it is good to do some payments or settle some balances.Calculation method: it means the calculation of collection and payment ratios based on total sales or purchases, or based on net sales or net purchases.Date: to specify a period to be studied.
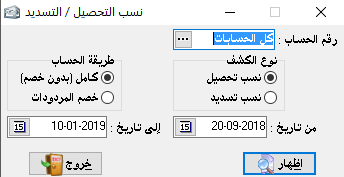
5- Debts agingIn
the light of non-cash dealing, we may allow a certain amount of debt or repayment periods, but we may bump into some customers who are delayed in paying if we do not remind them.
For the sake of our dealings, we must know the age of this debt.
If it is from a relatively long time (this is of course back to the financial officer or sales manager) we ask them to pay and we present a report of their debt age, so we divide the debt or credit period into a set of periods.
It is useful to know when the customer’s credit volume increase or decrease.
– Account number: we can select one account, secondary account, primary account, or group of accounts.
– The length of the period: when we divide the period of the debt into many periods, we should determine the length of each period may be a month, two months, or four months…etc. And that based on the nature of our products and the estimated capital turnover of the company.
– From date to date: it is specified the beginning and end of the credit period.
– Show more than: it means to show the periods after the specified period in this field.
If we specified more than (2) it means to show the third period and above. And if we specified (5) it means to show all periods.
– Show all periods: it cancels the work of the previous option.
And we can note that if we choose the number (5) in the previous option it will cancel this option.
– Number of periods: it means to how many section we will divide this credit period.
– Show accounts:a- Debit and credit so the obligations and rights will be combined.
b- Debit accounts only and it shows us what the customers owe us.
c- Credit accounts only and it shows us what we owe the suppliers.It shows the account number, name and all the periods we have identified, in addition to the current balance, and of course, this balance consists of debts or transactions that have been made during the specified periods, and each amount will be explained and the period in which the credit or debt has done.
Thus, statistically, we can know the age of the debt and on this basis, we can decide whether it is better to claim it or pay it as the case may be.
– File maintenance: Voltage fluctuations may occur for non-protected devices, which may very rarely affect the program.
So we check the files to see if they are intact or have a malfunction.
Of course, if there is a defect in which we stress that it is very rare because of the speed of the program and the speed of storage of data, the program shows us and then automatically repairs and return to work perfectly after this maintenance.
d- Daily transactions report: This report will show us all the transactions that took place during this day.

